According to W3Techs, 54.5% of all the websites on the internet use Google Analytics as a traffic analysis tool. While rest of the website owners are either not aware of the tool or face issues with proper integration of analytics on their platform.
So, here is a go-to guide for Analytic rookies, where we will discuss the importance and how to install Google Analytics on any running website. By the end of this article, you should be able to direct your website traffic in a Google Analytics account.
- Why Google Analytics
- Setting up Google Analytics
- Create a Google Analytics Account
- Add Google Analytics to Website
- How to Install Google Analytics on Wordpress
- Installing google analytics on ecommerce sites
- Verify your analytics tracking id
Index
Why Google Analytics?
You can understand the importance of google analytics from the fact that tech giants like Youtube, Wordpress, Pinterest and Reddit use google analytics as a tool for their traffic analysis. There are a lot of things you can do in google analytics but a few important aspects are mentioned below:
-
Segment and analyze your audience based on similar activities, events and behavior.
-
See how well each marketing channel is doing. It ultimately helps in deciding which channel to focus on and which one to sideline.
-
Keep track of your marketing campaigns and hence improve your marketing strategies.
-
Boost your content marketing strategy by measuring how long a user stays on your page.
-
Speed up your site and make it more mobile friendly. You can also determine which blog content is most popular and how many newsletter subscriptions you got from each blog post.
In one of our previous articles we discussed in detail about what google analytics can do, you can read through for a deeper understanding.
Setting up Google Analytics
To install google analytics on your website, you first handedly need a google account. You can also use a pre-existing account (if you have one) otherwise you will need to register for a new one.
Integrating and directing, all your website’s classified data to an external tool, requires a certain level of security and indemnity for you to trust it.
To achieve that, you must ensure your google account is secure and only you have access permissions because the last thing you want is anyone compromising your data or gaining illegal access to it.
Create a Google Analytics account
If you have your google account you do not need to sign up for a google analytics account. You can visit https://google.com/analytics and sign in with your pre-existing account. The next window will display three steps to setup Google Analytics.

Click on the sign up button to get started with the implementation process and fill in the required information for your website.
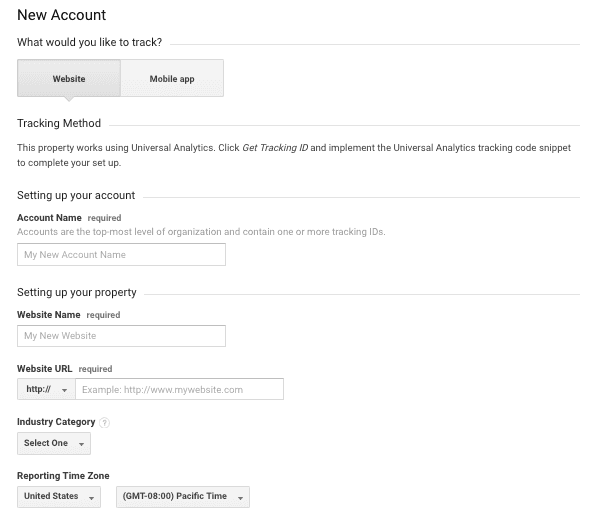
Once you populated the form with all necessary credentials, click the get tracking ID button.
The next important thing is to copy and paste the provided tracking code snippet into your website.
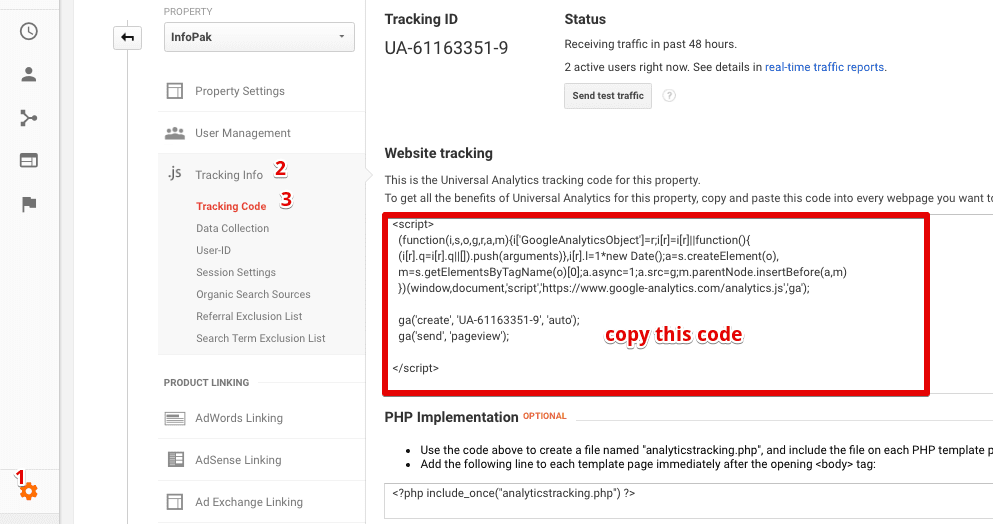
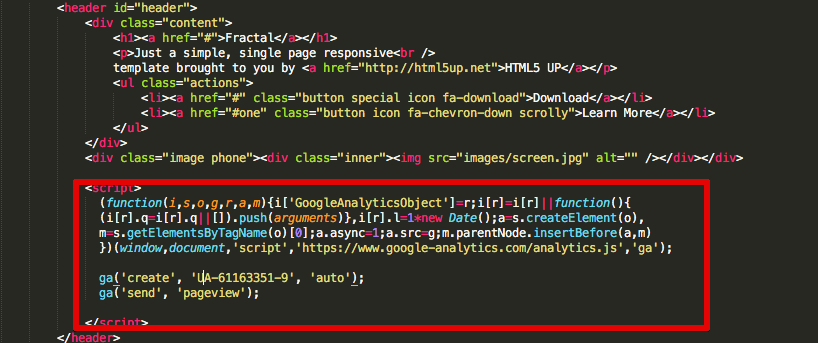
Adding google analytics to any website
Copy the code between the script tags from the last step and open your website admin panel. Paste this code just before the closing head tag(</head>) on every page of your website.
How to Install Google Analytics on Wordpress
Wordpress is used by 27.3% of all the websites, that is a Content Management System(CMS) market share of 58.8%. The reason CMS is immensely popular amongst marketers is because of its simplicity, ease of installation and user-friendliness.
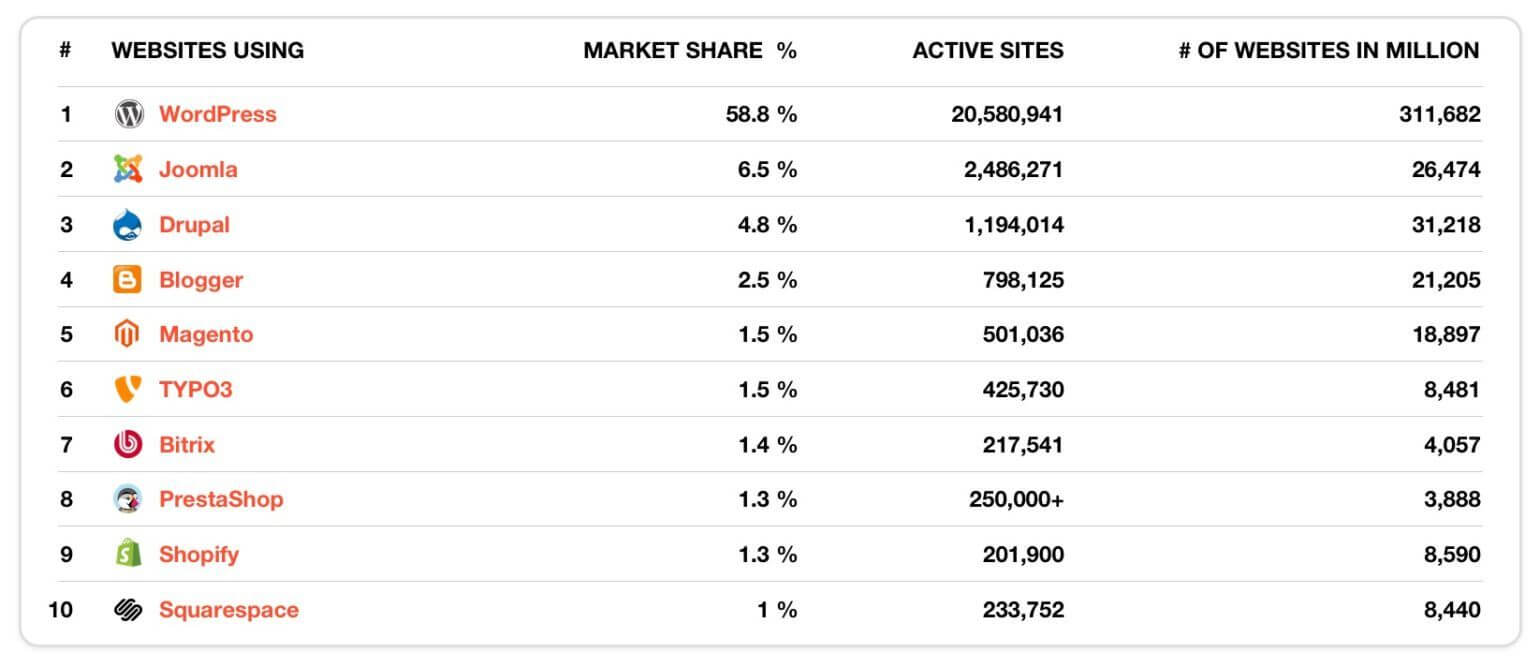
Source: websitesetup.org
Wordpress.com or Wordpress.org
Above all things, you should understand the difference between wordpress.com & wordpress.org. Wordpress.com is free to avail for anyone who is willing to create an online presence for its business or blog, hosted on the Wordpress server. Whereas, wordpress.org allows you to download the Wordpress setup and install on your own server. Keep in mind, you can not install Google Analytics on any wordpress.com blog.
There are two best methods to install google analytics in wordpress. You can either add analytics tracking code to header.php file or install google analytics plugin by Monsterinsights.
If you are familiar with coding I would suggest you add manually otherwise skip to second method.
Method1: Install Google Analytics in Wordpress Manually
I am assuming that you have your analytics tracking code and if you haven’t yet, please click here to start with analytics and get the tracking code. Once you get the tracking code, follow the steps below:
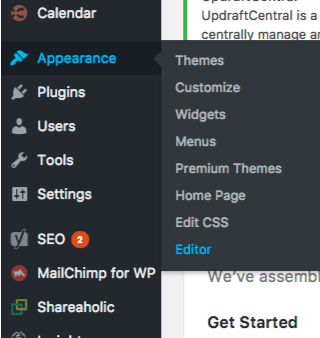
1. Login to your WordPress dashboard and go to Editor from the left navigation menu.
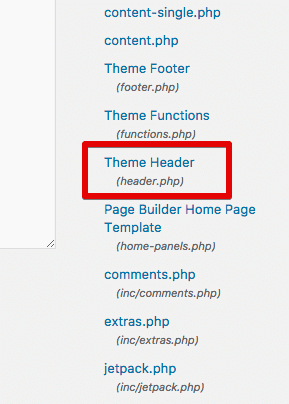
2. From the list of templates on the right side, click on header.php file. If you can’t find the file, press Ctrl+F and search for header.php.
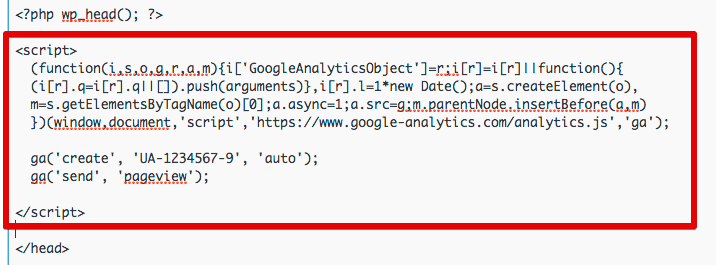
3. Inside the header.php file, look for the tag </head>. Copy your analytics tracking code and paste it just above the </head> tag.
4. Click on the update file button.
To verify if you set up the tracking code correctly, scroll down to Verify your analytics tracking id topic.
Method2: Google Analytics plugin by Monsterinsights
Google analytics plugin by monsterinsights is the most popular analytics wordpress plugin. It is active on more than 1 million wordpress websites. To install this plugin follow the steps below:
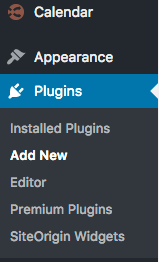
1. Login to your wordpress dashboard and click on ‘add new’ plugin from the left navigation menu.
2. In the search bar enter ‘google analytics monsterinsights’.
3. Click on the install now button on the Google Analytics for WordPress by MonsterInsights
4. Once you install and activate the plugin, a new item will appear named Insights in the left navigation menu. Click on Insights >> Settings to add your analytics account.
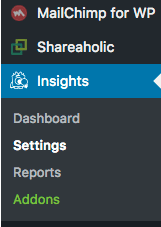
5. Inside settings click on the “Authenticate with your google account” button.
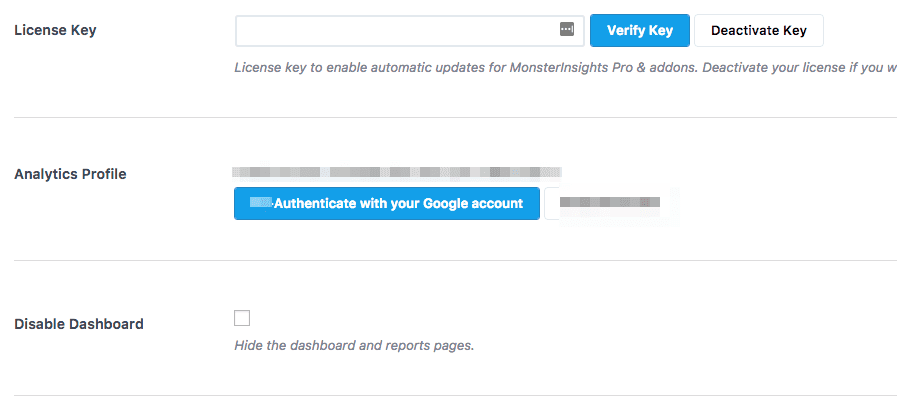
6. Follow the steps ahead to connect your analytics account.
Once the connection is successful, follow the steps below to verify setup.
Installing Google Analytics on Ecommerce Sites
We have already covered topics related to google analytics for an ecommerce Site. You can click on each of these links to get started with the tutorial.
Verify your analytics tracking ID
There are several ways to verify if you have properly setup your analytics account. The simplest one is to open your website in a new tab and check real time reports in Google Analytics. You can find real-time reports in the left menu I.e Real-Time>> Overview. If your installation is correct, you will see the number of active visitors on your site at that very moment.
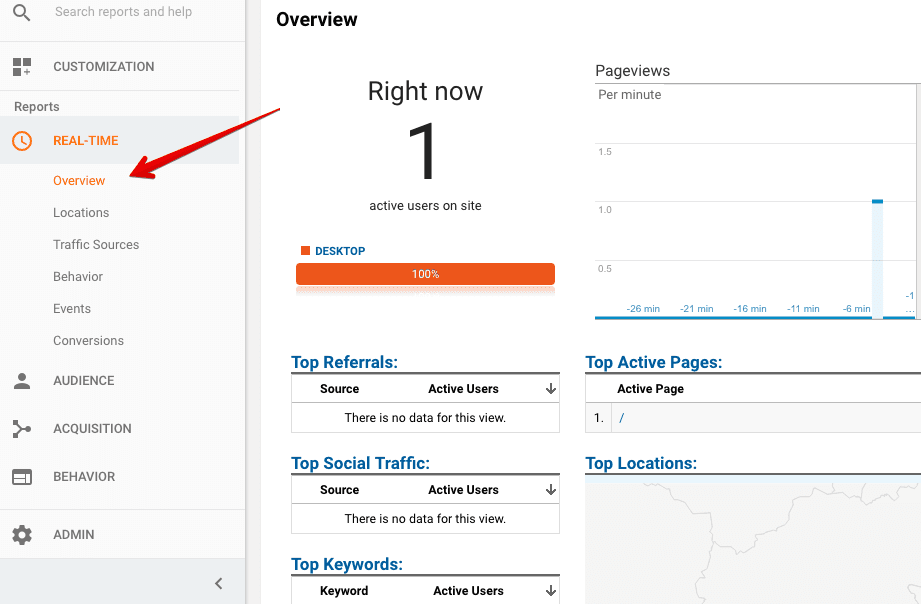
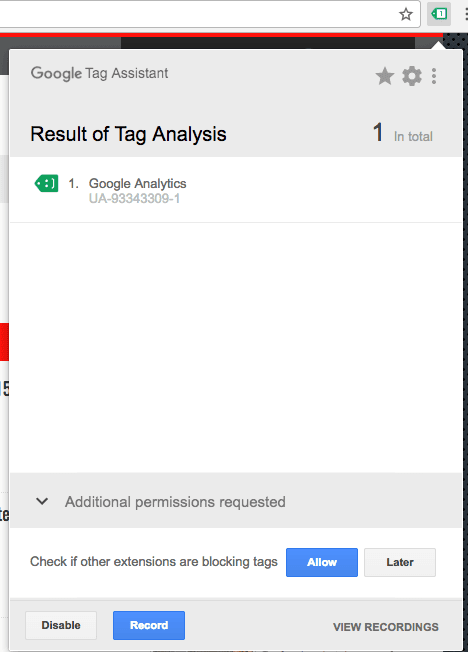
If you don’t see any real time visitors, then there might be a problem with your tracking code. To cross-check your analytics tracking id, install the Google Tag Assistant browser extension.
Once you get this extension, open your website in a new tab, click on the tag assistant icon, click the enable button and then reload the page.
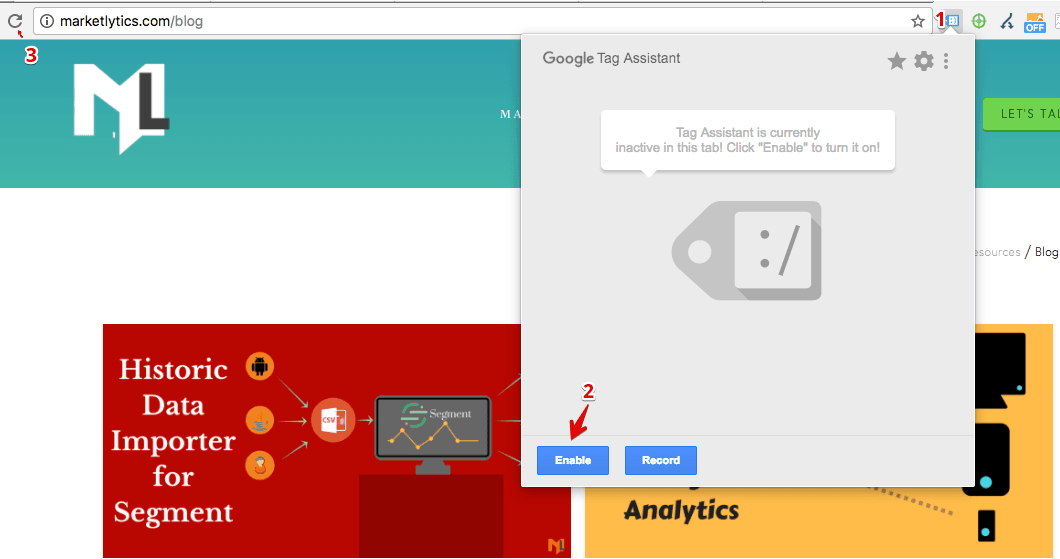
If there is an error in your analytics tracking code snippet, this window will display the error with message and the tag assistant icon color will be red. The green icon means your tracking code is good to go.
Note: If the setup is correct, the data in your google analytics account will appear within the next 24-48 hours.
Uptil now, you should have successfully integrated google analytics on your website. You would now see traffic being directed to your analytics account. In the next article, we will discuss some important things you could do after installation(i.e filtering spam traffic, managing users, using reports).
Once you install google analytics, now it’s time to configure google analytics to get actionable data.


