Working in an agency to get your clients best of the results can be super hectic. How does it feel when all your efforts to produce quality results go in vain? How it feels like when you invest your time and resources to generate leads for your clients and ends up in seeing inaccurate data in Google Analytics? Painful right?
Ninjas in digital agencies are result oriented and perfection enthusiasts. Working as an agency, you would always be interested to see accurate data so you can decide which marketing campaigns need to quit and which to continue. This sometimes becomes a big challenge for marketers having less knowledge of Google Analytics.
In this article, I am going to show you how to do an analytics data quality audit to make sure you have the data you can trust. Before going through this checklist, make sure to check the Google Analytics extensions which you will be using for different purposes.
How to use the Google Analytics Checklist?
This checklist is available for everyone and is set to view only mode. To use this checklist you will have to make a copy.
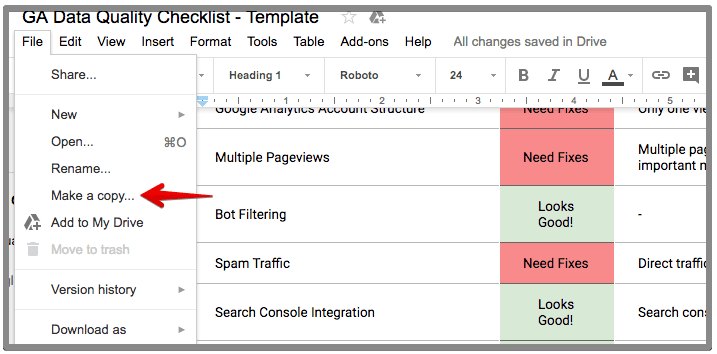
For each item on the list there are three responses:
Looks good: this means no issues found
Need Fixes: this is making the data inaccurate and need to fix
N/A: this doesn’t affect any data quality
23 points data quality checklist
1. Google Analytics Structure
You should always make sure to have an understandable and well-defined account structure. Clients usually aren’t aware of this and they proceed with the default settings. In a basic Google Analytics account, you should have a property with three different views.
- All website data view (unfiltered data)
- Master view (filtered data for analysis)
- Test view (for testing filters and goals)
This makes sure that you have a single view which contains accurate data that has filters and goals added. You can use this to analyze data and make decisions.
2. Multiple Analytics Codes/Multiple Pageviews
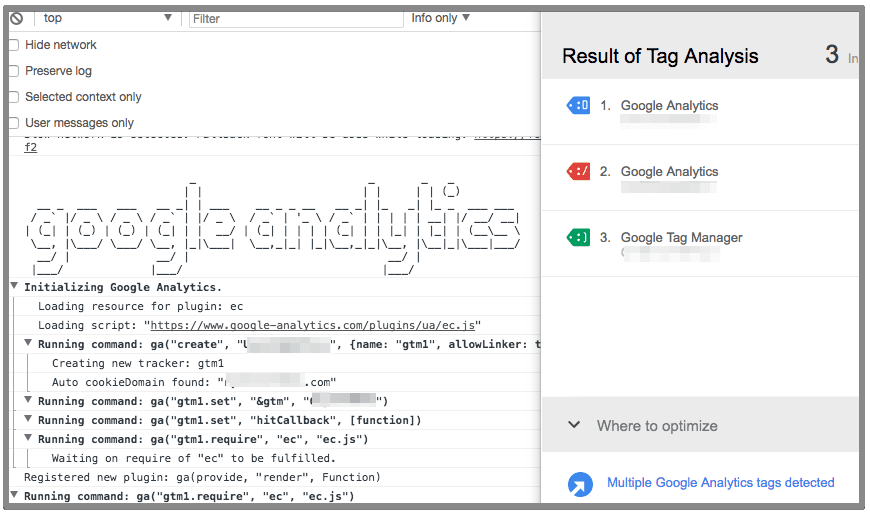
Your website should always contain a single Google Analytics tracking code because too many cooks spoil the broth. Unless you don’t add multiple codes for some reasons. Before doing anything test with Google Tag Assistant to find the analytics code and if the tracking ID matches the account ID.
You can also test with GA debugger to verify only single tracking ID exists on the website. You can add multiple Google Analytics account on the same website but having the same tracking code multiple times send duplicate hits.
3. Bot filtering
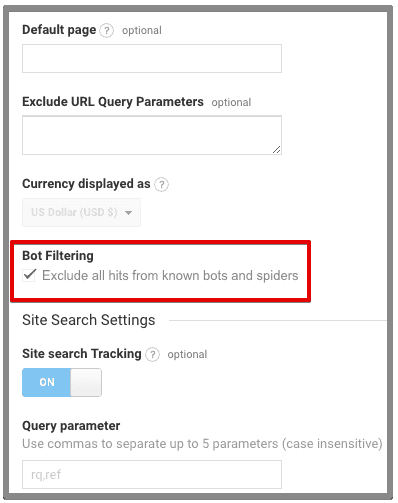
Since we are only interested in humans as traffic, you must shut the door of your website to the bots and spiders. Bot filtering is an internal feature of Google Analytics which blocks known bots and spiders. You will have to make sure this is enabled in your filtered view/master view so you will see the accurate data. You can do this by navigating to admin >> view settings >> bot filtering.
4. Spam Filtering
Spam traffic and bot traffic are two different things but you have to exclude both from your analytics data. The common way to identify a spam traffic source is by looking at bounce rate, %new sessions, and pages/session. You can follow this guide to learn how to identify spam filters and remove them from your analytics data.
5. Search Console
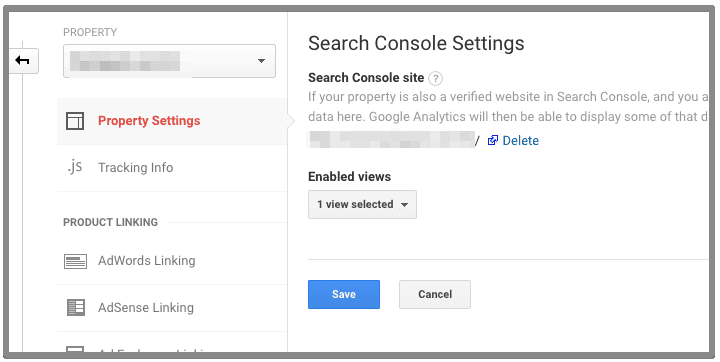
Connecting search console with Google Analytics allows you see all the SEO data in analytics. You can see the top organic keywords and landing pages. To verify the search console linking, navigate to admin >> property settings >> adjust search console.
6. Enable Demographics & Interest Report
This is one of the important things that most of the people aren’t aware of and forget to enable it. Enabling demographics allows you to see the visitor’s location, gender, age, and interests. A ton of data which can help your analysis process easier.
To verify this, navigate to admin >> property settings >> enable demographics and interest reports.

Related post: why google analytics not showing up demogaphics reports?
7. Exclude Internal Traffic
You should always exclude your internal traffic from being tracked in Google Analytics. It is recommended that you exclude all internal traffic using filters. This way your data will be only related to external website visitors and anyone from within your internal business.
You can easily exclude multiple internal users with a custom filter.
8. Currency & Time Zone
By default, the time zone selected in Google Analytics is 'United States'. Verify that you have added the right time zone so you will see the data at the right time. Secondly, the default currency setup is USD, so you will have to change that according to the currency you are using. You can verify both these settings under view settings.
9. Site search tracking
Site search is also an important feature you need to enable to be able to get benefit of Google Analytics. This isn’t enabled by default so you will have to enable it after you set up a new account.
Site search tracking enables you to track the keywords visitors search on your site. Enabling site search helps you track what visitors are searching for on your website. To verify, navigate to admin >> view settings >> site search settings.
10. Goal Conversion Issues
So the next thing you will need to verify is conversion tracking. If you are investing money on Adwords then you will definitely want to see the results. Besides setting up conversions in Adwords, you can also import Google Analytics goals.
It is very important to verify that your goals are tracking properly. To verify this, you can simply follow an action on the website to which the goal is linked and check in Google Analytics.
11. Bounce rate and overall GA analysis
One of the primary metric to monitor in Google Analytics is Bounce Rate. There are two cases when you need to worry about. Either the bounce rate is too high or is too low.
So if you see the bounce rate to be too high or too low(unexpected), it’s is necessary to diagnose for the problem.
12. Referral Exclusion
If you are managing an ecommerce website or a website with multiple domains or subdomains, you have to be careful about referral traffic. You will either setup cross domain tracking or sub-domain tracking.
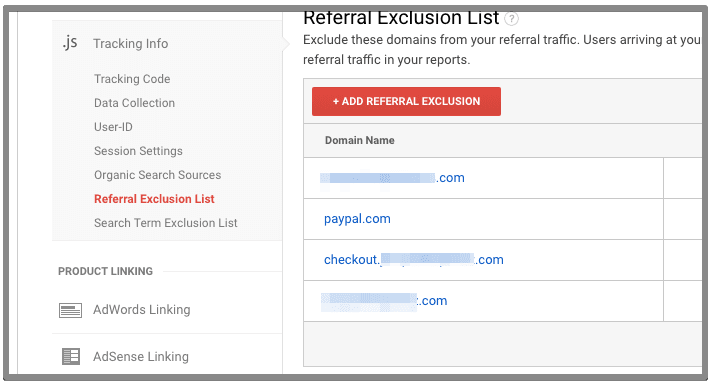
Once you setup any of the option according to your website setup, you will have to make sure to add the root domain to referral exclusion list. This excludes root domain from showing up as referral traffic in analytics.
To verify, navigate to admin >> property >> tracking code >> referral exclusion list. Verify if you have already added the root domain and any other payment gateway you are using on your website.
13. Adwords linking
If you are running Adwords campaigns for your clients, make sure you have connected the right Adwords account with analytics. This way you will be able to import analytics goals into Adwords and also use analytics data for remarketing.
Sometimes you link the Google Adwords account but some note set and product campaigns are being recorded in Adwords. This can be because some traffic is sent with google/cpc or there is another Adwords sending traffic.

14. Events (values)
Event tracking help you measure actions visitors take on your website. So you it is necessary to confirm that the values you are passing via event are correct and meaningful. If you are tracking multiple events on a site, sometimes it happens that you mistakenly pass different values.
For example, you are tracking multiple forms on a website, if you set event category as ‘Form Submission’ and ‘form submission’ then you will see two different categories in analytics. The good way is to keep the event category same for similar types of actions.
15. Event tracking errors(site errors)
Sometimes it happens that due to website code changes or code errors, the event doesn’t fire properly. So you can’t see the data you need in analytics. Verifying the events are executing properly should be the part of data quality test. With Google Tag Manager it’s even more easier to track and test event tracking.
16. Missing event parameters(undefined, not set)
Another issue which occurs after setting up event is missing parameter values. Sometimes you may see undefined or not set. This issue commonly occurs when you setup event tracking via Google Tag Manager.
17. Channel grouping
Google Analytics by default has multiple default channel groups. So all the traffic sources fall into these categories. But if there is any source that doesn’t belong to any of this, you can define a new channel grouping.
Sometimes a traffic source shows up in a different channel which makes the data inaccurate.
18. Sub or cross-domain requirements
If the website is based on multiple domains or have subdomains, you will have to careful about tracking the same user on both sites. To verify cross-domain or subdomain tracking is working correctly, install GA Debugger extension in your browser.
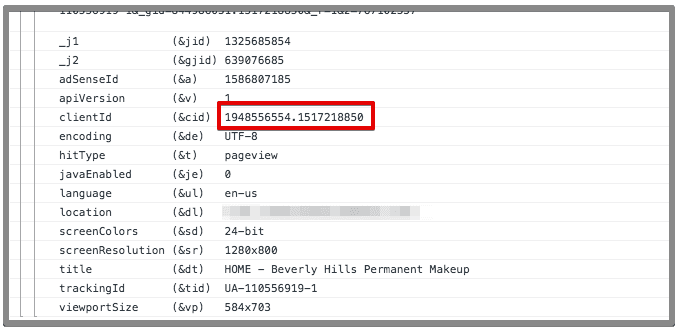
Right click inspect and select search console. Copy the client ID appearing in console and then navigate to the other domain or subdomain. If cross-domain or subdomain is setup correctly, the client ID will remain the same, otherwise a new client ID will be generated.
19. Frames / dynamic pages
If there are any iframes added on the website, then you might not be able to track events properly. For this to happen the analytics tracking code should also be added on the iframe.
20. Ecommerce tracking
If you are dealing with ecommerce website, you have to verify ecommerce tracking is enabled and the ecommerce goals are setup correctly. To do this, navigate to admin >> view >> ecommerce settings.
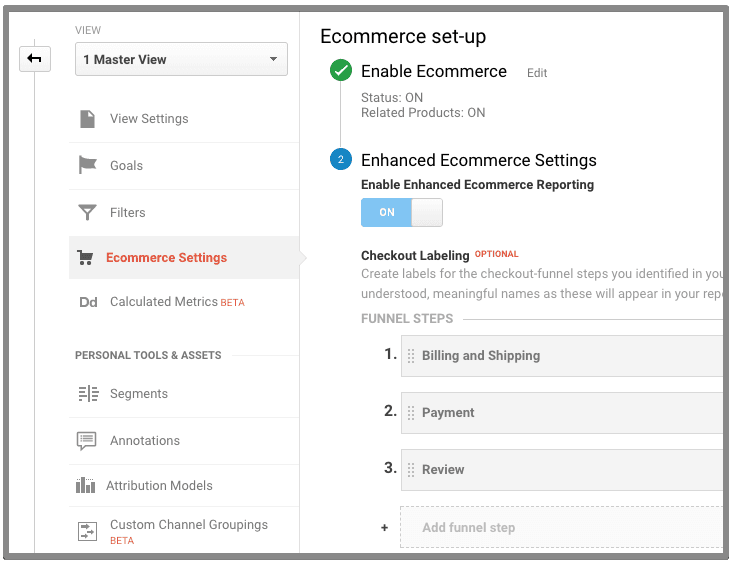
Now, ecommerce tracking isn’t simple as enabling a button. You have to make sure that you add proper ecommerce tracking codes on your site or use the Google Tag Manager plugin for enhanced ecommerce in Woocommerce.
21. Multiple transactions
There may occur multiple issues after setting up enhanced ecommerce tracking and you may not notice because you can see the transaction details. You can create a simple custom report to verify duplicate transactions. One of the proper ways to fix duplicate transactions is by setting up cookies with Google Tag Manager.
22. Enhanced ecommerce steps
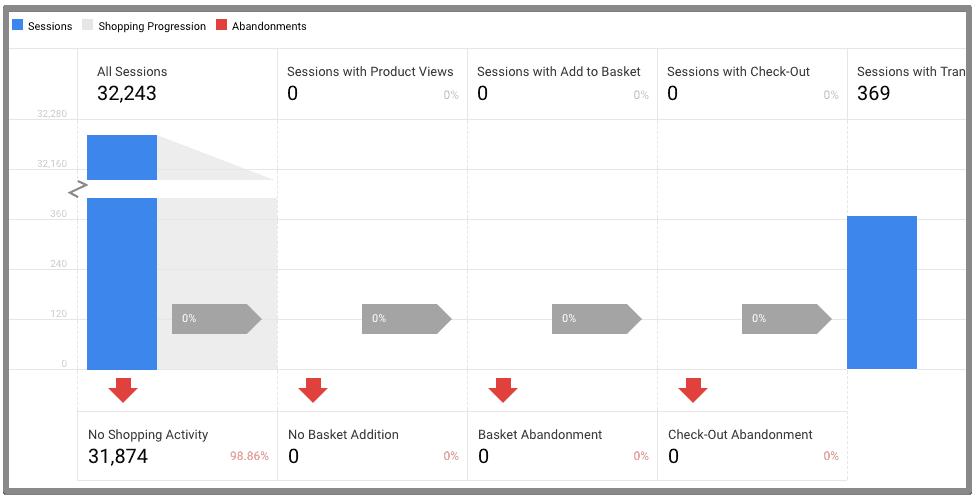
The biggest benefit of enhanced ecommerce tracking is you can track the purchase behavior. Visitors starting from viewing product to the final purchase. You need to verify that all the steps the steps are working properly and you are not missing data anywhere. The issues arises if a certain event isn’t executing properly and Google Analytics isn’t receiving data for that step.
23. Audiences
Google Analytics allows you to create an audience and use in adwords for remarketing purposes. When you are importing any audience from Google Analytics, make sure the conditions are set properly and the audience is correct.
Over to you!
Sounds tiring right? But we know you are a ninja and easy things bore you. All of this process may seems exhausting and can take approximately 5 hours. However, if you still want to sit back and relax like a boss, we are here for you. We make this process easier by helping you in controlling analytics data quality for your client. This way you will be able to focus on your marketing campaigns and you will have an analytics professional by your side to handle analytics. Contact us for getting a FREE Google Analytics data quality for one of your client.


