
What is Google Tag Manager?
Google Tag Manager is a FREE tag management solution put together by Google. It is used to deploy analytics and marketing tags on websites and mobile apps. It is best developed for marketers to manage website tags without changing site codes.
Benefits of Using Google Tag Manager
Although there are a lot of benefits of using Google Tag Manager but the most important is the way you can easily install any analytics or marketing tag. It can be used to install Google Analytics, Facebook Pixel, Mixpanel, Segment and many more.
I will not explain the benefits in details because we have already published a list of things Google Tag Manager can do.
Getting Started with Google Tag Manager
As mentioned earlier, GTM is a FREE tool so you don’t have to worry about any payment. To use GTM, you will have to create an account with your Gmail id and add GTM code to your website.
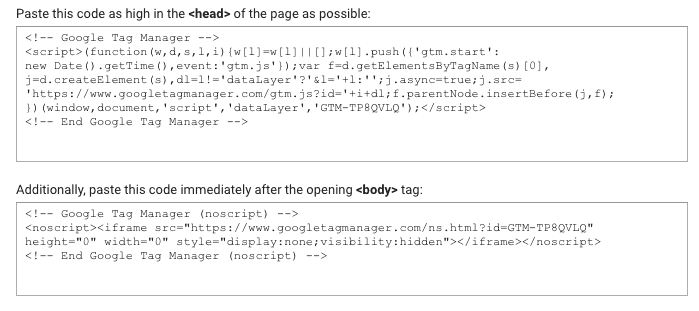
Google Tag Manager provides two types of codes to add on your website. One in the head section before </head> tag and the other in the body section right after the opening body tag <body>.
Once you add both the codes on your website, you can then test with Google Tag Assistant to verify installation.
The Components of Google Tag Manager
There are three main components of Google Tag Manager. Tags, Triggers, and Variables. We will understand each in detail because you will be mostly working with them.
Tags:
As we know that GTM is used for managing codes on your website, that is why it is known as tag manager. A tag in GTM is any code snippet that you add to your website. It can be a Google Analytics tag, Adwords tag, Facebook Pixel tag or any other. In GTM language, we call them as tags.
GTM contains built-in templates for a lot of analytics and marketing tools. Templates make it possible to add a tag easily. If you want to add a tag on your website, for which a template is not available, you can add it via custom HTML tag.
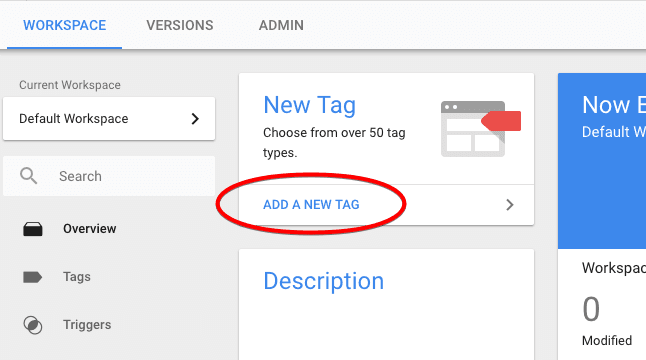
To view the list of available tag templates, click on Add a New Tag on the home page.
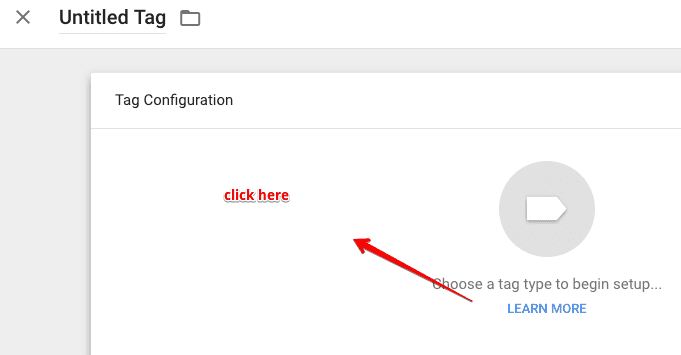
Next, click on tag configuration
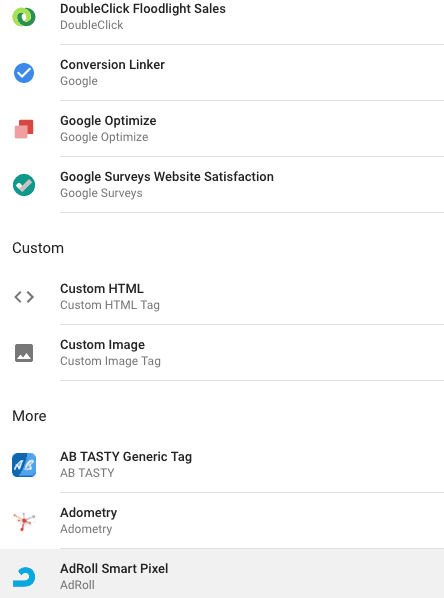
You can scroll the pop-up list to view all the templates available. You will also see a custom HTML tag, which is used to add any JavaScript code on your site.
Triggers:
A trigger in GTM is a condition that evaluates to true or false during runtime. It observes any change on the site and decides whether or not to fire a tag.
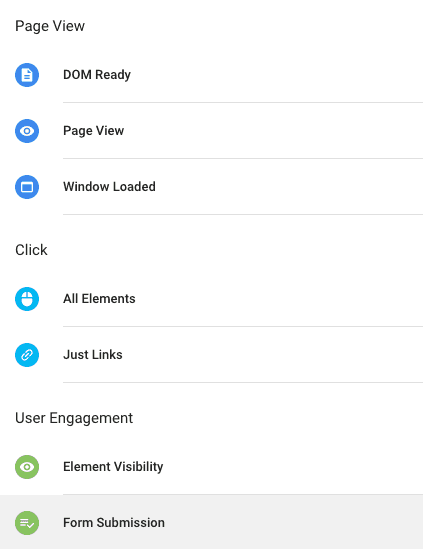
Google Tag Manager offers a list of trigger types to fire your tag. Some of the common and mostly used triggers are listed below:
Pageview: fires a tag when a pageview occurs
All Elements: fire a tag on all clicks
Just links: fire a tag when a link is clicked
Form Submission: fires a tag when a form is submitted
YouTube Video: fires a tag when a YouTube video is played
JavaScript Error: fires when JavaScript error occurs
To view the trigger types available in GTM, navigate to triggers from the left column and click new.
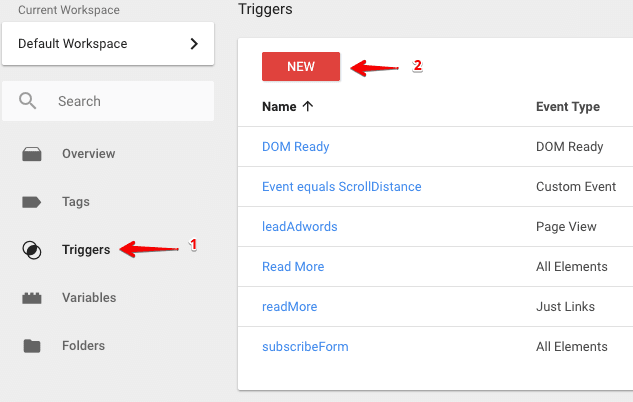
Click trigger configuration from the pop-up window. Scroll down the trigger types list to view all the triggers available in GTM.
A trigger must be associated with a tag to execute. To understand more about triggers in depth, you can follow this article.
Variables:
A variable in Google Tag Manager is a name-value pair for which the value is generated during runtime. A variable will remain empty in your GTM unless it is associated with a tag, trigger or any other variable.
There are two types of variables in Google Tag Manager.
Built-in variables and user-defined variables.
Built-in Variables
Built-in variables are predefined in Google Tag Manager. We can not customize them. Although they are disabled by default. To view the list of built-in variables available in GTM, click on Variables from the left column.
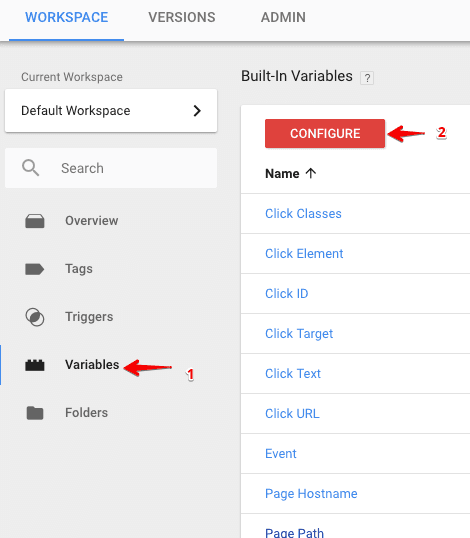
Click on the configure button to view and enable any of the built-in variables.
Let’s look at the page variables:
Page URL: returns a string with full URL of the current page (https://example.com/how-to-test)
Page Hostname: returns a string with the full hostname of the current URL(https://example.com)
Page Path: returns string with relative path of the current page(/how-to-test)
Referrer: returns a string with the full URL of the page that brought the user to the current page(https://test.com/blog)
User-Defined Variables:
These variables are defined by users and not pre-defined. You can create your own variable to save data during run-time. For example, you can create a user-defined variable to save the Google Analytics tracking ID or you can pass a form field value via user-defined variables. You can create your own variable under pre-defined variables.
To understand further about GTM variables, you can the variable guide for Google Tag Manager.
Testing and Debugging in Google Tag Manager
The beauty of Google Tag Manager is its testing and debugging features. Whenever you make a new change in GTM, you can test before making them.
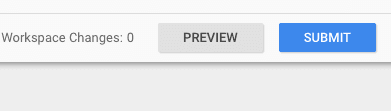
For testing and debugging, we use the preview mode and to publish the changes we simply click on the submit button.
In your GTM account, you will see the preview and submit buttons on top right of your account.
Whenever you add anything in tag manager, it is recommended that you preview and test changes. Let’s say you have added Google Analytics tag in GTM and want to preview before publishing it live.
Click on the preview button from the top right of your GTM account.
When the preview mode load, open your website in a new tab.
After the website has loaded, you will see the debug mode at the bottom of the page.
It displays the list of tags that are fired and those aren’t fired.

As you can see in the above image, our Google Analytics tag(GA Pageview) has fired successfully. You can also see the type of tags we can install with GTM(Facebook, Mixpanel, Optimize, Adwords..)
Once you confirmed that tag is firing, you can then click on the submit button to publish changes.
Adding Multiple Users
In Google Tag Manager, you can add other people to work on your container. For example, if you have hired a tag manager expert to work for you, you can add him/her as a user.
This way you will not have to share your Gmail credentials to anyone else for the sake of Google Tag Manager.
You can restrict the user from making changes in GTM by controlling the access level. A user can read, edit, approve and publish changes in a container.
To read more about users and permissions click here.
Import & Export Container
Importing and exporting containers in tag manager allows you to create or share your implementation with others. When you import or export a container, it is actually a JSON file containing tags, triggers, and variables.
One of the main reason you would want to import or export a container is, you may have multiple similar websites where you want to set up similar tags, triggers, and variables.
To learn how to import and export a container in GTM, follow our step by step guide.
Folders – Organize Tags, Triggers & Variables
Google Tag Manager seems to be empty at first and easy to handle fewer tags, triggers, and variables. By adding more tags and triggers, your container can into a complex thing.
To avoid the complexity and easy to work for yourself and for your team, you can organize them into logical groupings called folders.
Always use folders to organize tags, triggers, and variables.
Conclusion
Google Tag Manager can make your life a lot easier. You can improve your site speed by merging all the tags in tag manager and firing them specific pages only. I hope this quick overview will help you get familiar with GTM. Click on the below heart icon if you like this guide or if you are looking to hire a tag manager professional, get in touch with us.