Mixpanel is quite different from Google Analytics. It offers different types of libraries for setting up Mixpanel on different platforms like websites or mobile apps. For websites, Mixpanel offers a JavaScript library which contains multiple functions to set up events.
For example, if you want to track pageviews, you will have to setup pageview event using the pageview function(mixpanel.track(“Pageview);. So you don’t need to be a ninja but at least need to have basic knowhow of different types of Mixpanel functions to properly follow your tracking plan.
The Mixpanel tracking snippet initiates the Mixpanel library which contains the mixpanel.init function. If you have enabled auto tracking, this will track pageviews automatically, otherwise, you will have to add the pageview function(mixpanel.track(“Pageview”);).
In this article, I will walk you through some of the basic and necessary functions that are used to track events in Mixpanel. This will help you understand how Mixpanel events can be used for tracking different types of events. You can, of course, thank me later.
Intro to Mixpanel
As you know that Mixpanel is an event-driven advanced analytics tool. It focuses on tracking events rather than pageviews and we already have covered intro to Mixpanel in our previous posts.
So for tracking events, Mixpanel provides a certain set of libraries each with different functionality. We have to use these libraries to setup everything we need to track.
Basic Functions to Set up Mixpanel
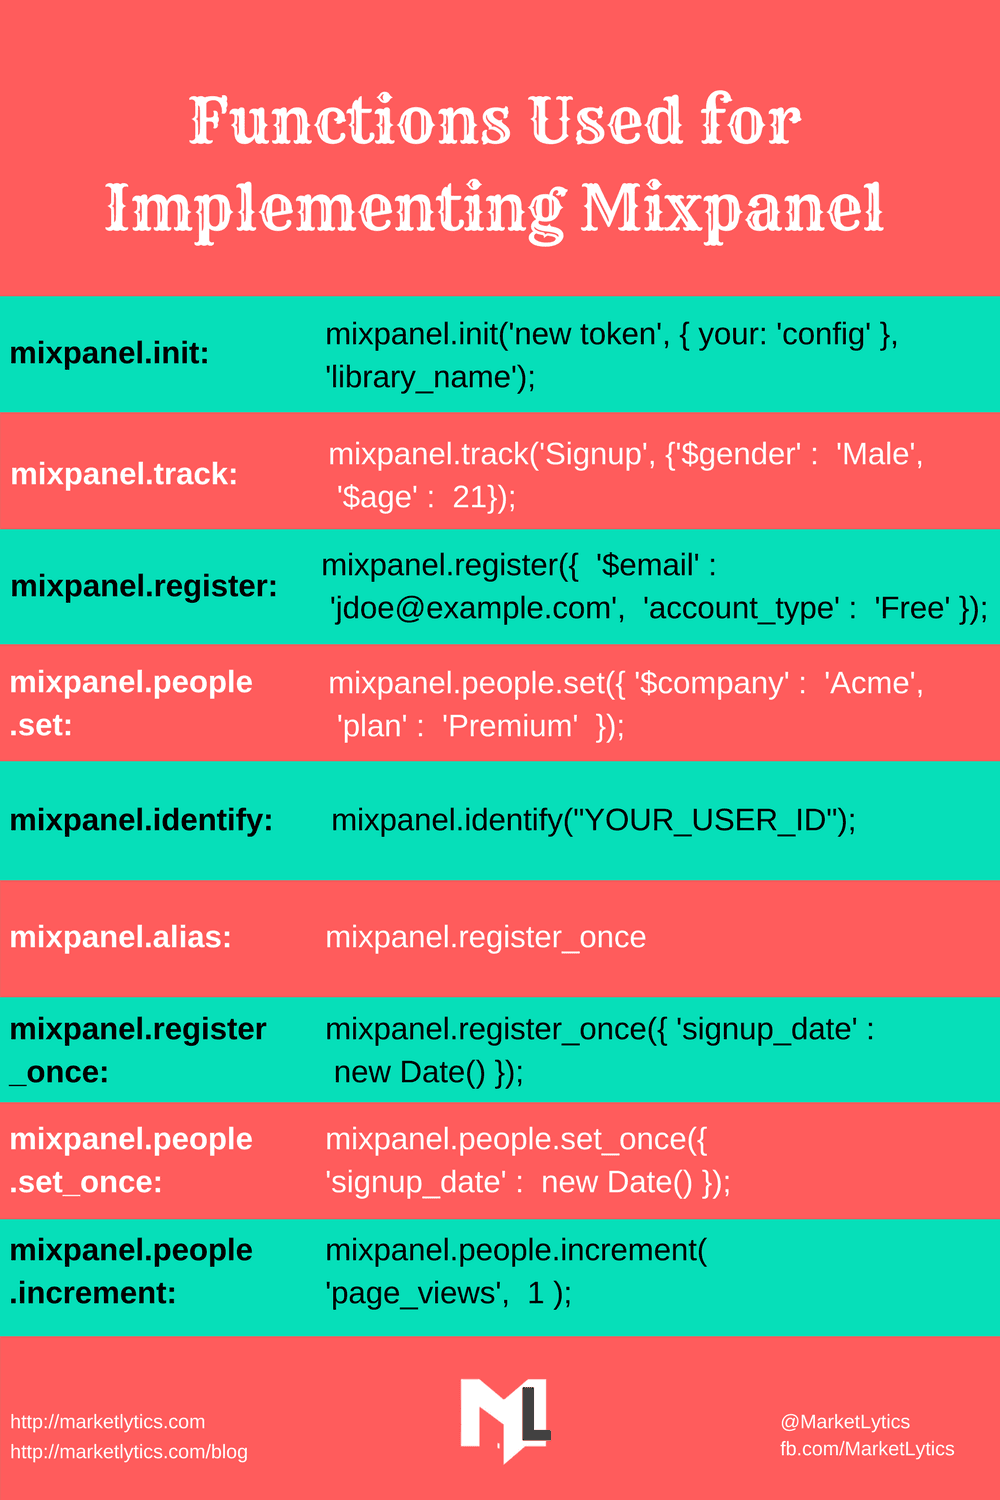
Below is a list of functions to use while setting up Mixpanel tracking.
mixpanel.init
As the name suggests, we use this function to initiate the mixpanel tracking
mixpanel.init('new token', { your: 'config' }, 'library_name');
mixpanel.track
This lets you stalk your users’ activity, not literally though. mixpanel.track used to track events and properties performed by the user
mixpanel.track('Signup', {'$gender' : 'Male', '$age' : 21});
mixpanel.register
This is used to store super properties i.e properties that we want with all events and don’t have to send them again to mixpanel.
mixpanel.register({ '$email' : 'jdoe@example.com', 'account_type' : 'Free' });
mixpanel.people.set
This lets you set the people, again not quite literally. mixpanel.people.set is used to set properties on the user profile
mixpanel.people.set({ '$company' : 'Acme', 'plan' : 'Premium' });
mixpanel.identify
With mixpanel.identify you can identify people. This is used to identify and create a user profile
mixpanel.identify("YOUR_USER_ID");
mixpanel.alias
This brings past to present. mixpanel.alias is used to stitch data between user’s previous and current id
mixpanel.alias( 'newer_id', 'new_id' );
mixpanel.register_once
This is similar to the register function with the exception that once set, it can’t be overwritten
mixpanel.register_once({ 'signup_date' : new Date() });
mixpanel.people.set_once
This is similar to the people.set function with the exception that once set it can’t be overwritten
mixpanel.people.set_once({ 'signup_date' : new Date() });
mixpanel.people.increment
This is used to maintain counts on users profiles.
mixpanel.people.increment( 'page_views', 1 );

The functions we discussed above are enough to implement a basic tracking plan. But let’s dig a little deep in the Mixpanel library and see what additional items Mixpanel can offer us.
mixpanel.init
We use this function to initiate the Mixpanel tracking. We can also pass configuration with the init to override the default configs like debug or persistence. We can also run multiple Mixpanel projects by declaring the library name.
mixpanel.get_property
We can use super properties stored in the Mixpanel cookie with help of this function
mixpanel.cookie
Cookies are scrumptious. Mixpanel.cookie contains all the data stored in Mixpanel’s private cookie including the name of the cookie and super properties.
mixpanel.get_distinct_id()
Returns the unique id that is used to store the user profile in Mixpanel.
mixpanel.getConfig
Returns the value of the config for Mixpanel, for example, the token, disable persistence, cross_subdomain_cookie.
mixpanel.setConfig
Update the default configuration of Mixpanel. For example, we want to update the cookie life or update the blacklist properties or to enable Mixpanel debug function
mixpanel.config
Contains all the config data for Mixpanel
mixpanel.disable
Doesn’t track events passed in the param for the user, if no params, then all events won’t be tracked
mixpanel.people.delete_user
This helps you with moving on. mixpanel.people.delete_user function deletes the user’s entire data from Mixpanel
mixpanel.time_event
Tracks the elapsed time between the ‘time event’, when called and ‘track calls’
mixpanel.people.clear_charges
It helps you in case of regrets and permanently clears all revenue report transactions from the current user’s people analytics profile. We should use this to clear data from our test users.
mixpanel.reset
Clears super properties and generates a new random distinct_id for the instance. Useful for clearing data when a user logs out
Here are a few configuration from the mixpanel object, Complete list of configs can be found here
- Autotrack : true
- Cookie_expiration : 365
- Cookie_name : "mp_22420ac6ab5de7b77f5194ba37655aaa_mixpanel"
- Cross_subdomain_cookie : true
- Debug : false
- Disable_cookie : false
- Disable_persistence : false
- Loaded : function()
- Persistence : "cookie"
- Persistence_name : ""
- Property_blacklist : []
- Save_referre r :true
- Secure_cookie : false
- Store_google : true
- Token : "9e1c164b0a847343a7b7c2999ffe09c7"
- Track_links_timeout : 300
- Track_pageview : true
- Upgrade : false
Conclusion
So Mixpanel isn’t a piece of cake.It is an advance tracking tool and one needs to have a good understanding of programming languages. If you are good at JavaScript & jQuery, you can easily setup Mixpanel on websites. If you have anything to say about this topic or need help with Mixpanel implementations, let us know.


