If you are aware of what Google Tag Manager can do, you would be interested to manage your website tags with GTM. It makes it easier for non-developers to get started with using analytics with marketing tools.
This article will help you install Mixpanel with Google Tag Manager and track few major events like pageview, link clicks, and form submission.
If you are reading this article, I am assuming that you already have a good knowledge of using Google Tag Manager and how it works. In case, you are new to Google Tag Manager, please go through the beginner’s guide.
Create a Mixpanel Account
Creating a Mixpanel account is easy. If you haven’t created an account yet, navigate to https://mixpanel.com and sign up for a new account.
Once you sign up successfully, you will be landed to your dashboard where you will find Mixpanel tracking code.
There are two ways to set up Mixpanel tracking, programmatic and codeless. We will follow the programmatic way. Copy the code that is displayed under the programmatic section.
![]()
Now we don’t have to do anything in Mixpanel except copying the tracking code. Open Google Tag Manager in a new tab select the specific container.
Create a Custom Tag
There is no any built-in template for Mixpanel so we will create a custom tag and paste the Mixpanel tracking code. To create a custom tag, follow the steps below:
- Create a new tag
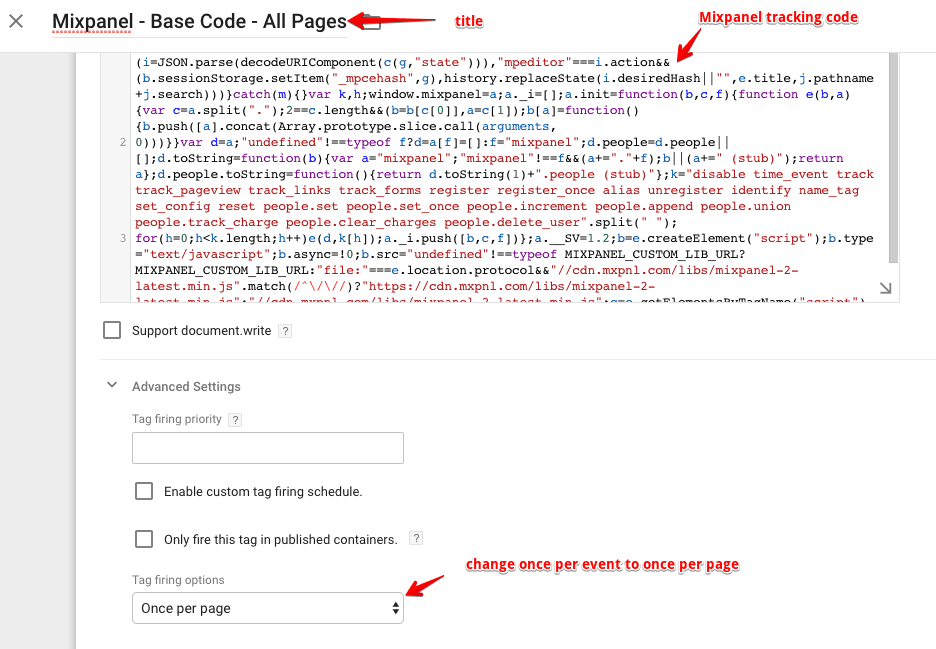
- Change the tag title to something descriptive i.e Mixpanel – Base Code – All Pages
- Select the tag type as Custom HTML
- Paste the Mixpanel tracking code inside the HTML field
- Click advanced settings and change the tag firing option to Once per Page.
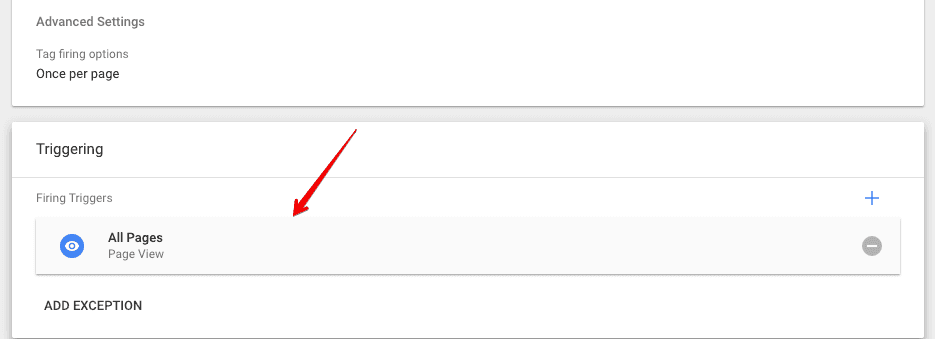
Click on the triggering option and select All Pages default trigger.
Save and preview the tag to make sure it is firing.
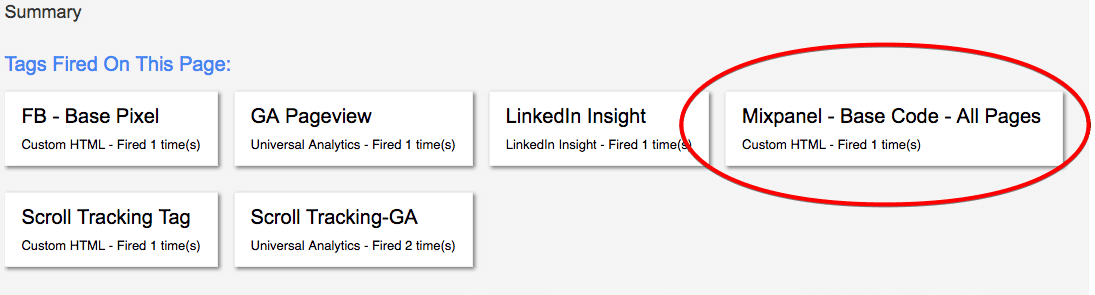
I have other tags too that are set to fire on pageview so tag to note here is Mixpanel, which is firing properly.
We know that Mixpanel is an event-centric tool so if we have to track a simple pageview, we will have to define a pageview event.
Let’s add our first Mixpanel event.
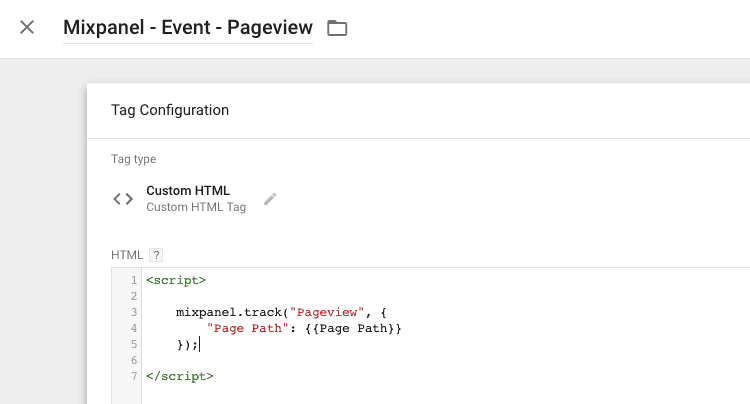
Setup Pageview Event
To set up a pageview event, we will again create a custom HTML tag in GTM. we will use the Mixpanel.track method to track events. Follow the steps below to create a pageview tag.
- Create a new tag
- Rename the tag as Mixpanel – Event – Pageview
- Select tag type as Custom HTML
- Copy and paste the below code in HTML field
<script>
        mixpanel.track("Pageview", {
                "Page Path": {{Page Path}}
         });
</script>
Click advanced settings >> tag sequencing and select the checkbox “Fire a tag before Mixpanel – Event – Pageview fires”. Select Mixpanel – Base Code – All Pages
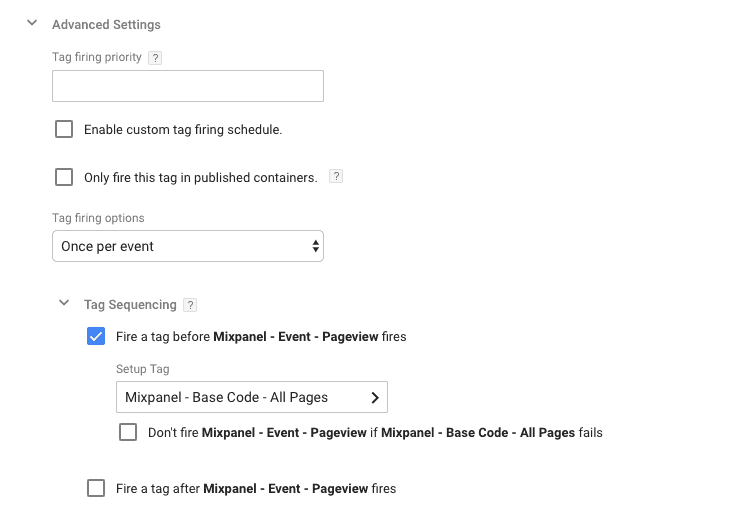
This ensures the Mixpanel base code to fire before the event code fires.
Select the All Pages trigger to fire this tag.
Save the tag, refresh preview mode and reload your website to test the pageview event.
Navigate back to Mixpanel account and click on the check button at the bottom if your account is receiving any events. If you followed the above steps properly, you will see the message “You are successfully sending data!”
Click on the next button to go to Mixpanel dashboard. Click on live view from the left panel.
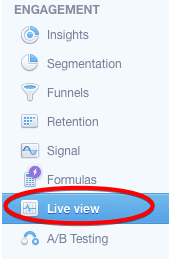
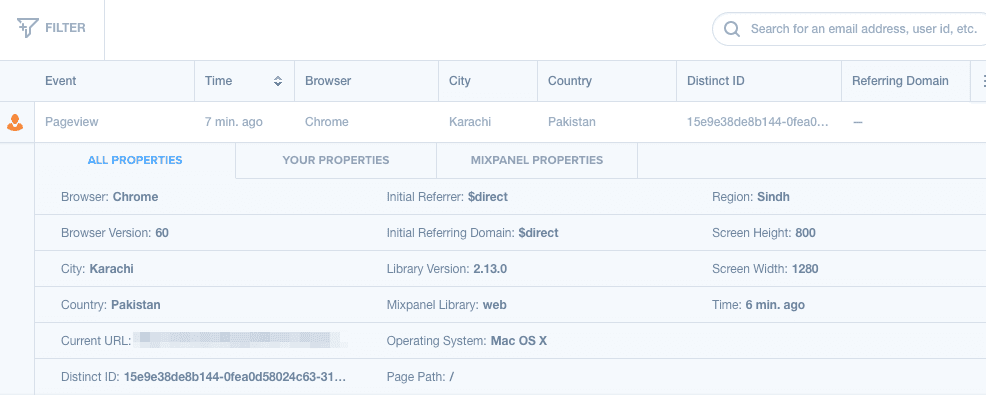
You will see the pageview event in live view. Click on the event to see details of the event.
If your purpose is to just track simple pageviews, you can go back to GTM and publish changes. Otherwise, you can continue reading to understand how to track button clicks and form submission tracking.
Setup link Click Event
Tracking any action with GTM is possible but one needs to have a good command over GTM variables and custom codes. We can track a unique link on any page or all links at once.
Let’s understand how to track a unique link click using GTM.
First, you will have to make sure you have enabled all the built-in click variables.
Find the unique id or class that is associated with the link you are going to track. For example, the link you are going to track is:
<a href=”https://example.com” id=”read-more”></a>
Follow the steps below to create a trigger.
- Click Triggers from the left menu in tag manager
- Create a new trigger
- Rename the trigger
- Select the trigger type as Just Links
- Configure the trigger as displayed in the image below.
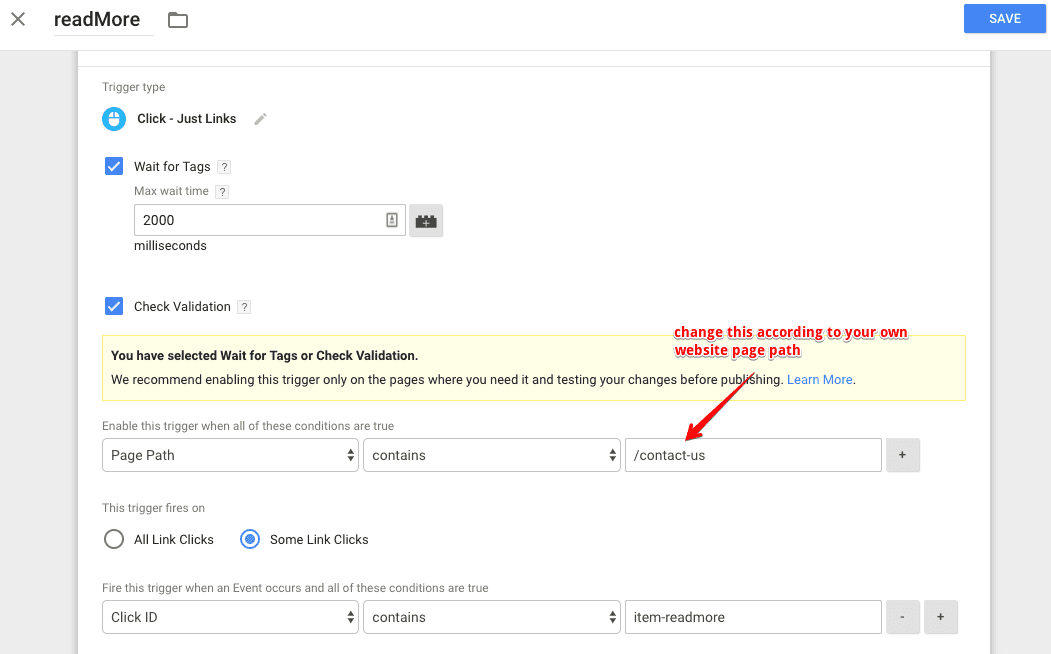
Save the trigger.
Now we will create the link click tag, that will send data to Mixpanel. Follow the steps below to create the tag.
- Create a new tag
- Rename the tag
- Select the tag type as Custom HTML
- Copy and paste the code below into the HTML field
<script>
  mixpanel.track("LinkClick", {
    "Click ID":{{Click ID}}
    });
</script>
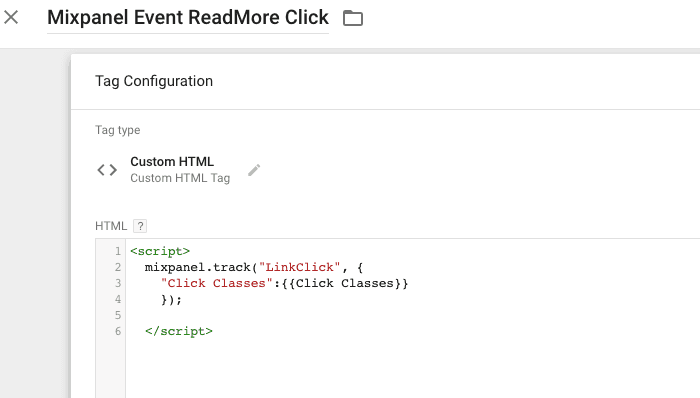
Click advanced settings >> tag sequencing and select the Mixpanel library to fire before the event tag.
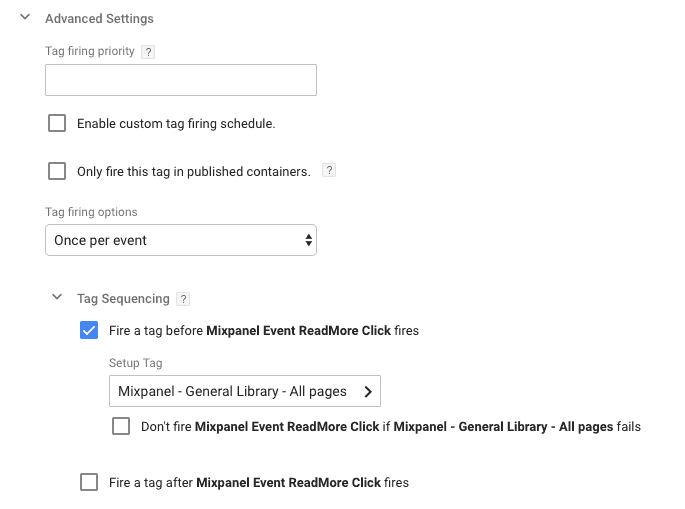
Add the trigger we have created earlier.
Save the tag.
Refresh the preview mode and test your tag.
Open Mixpanel insights to see which events are active and the number of times it fired.
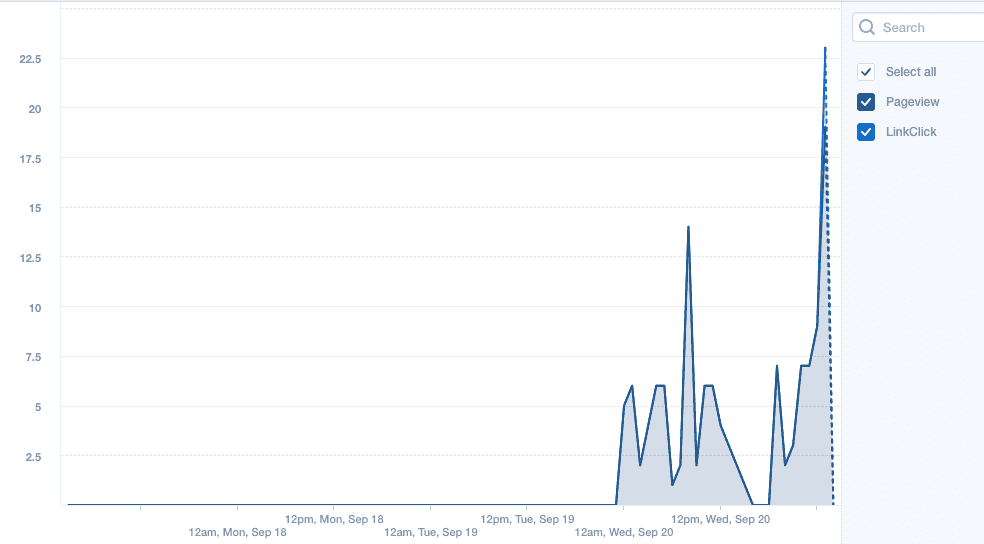
If the link click event is showing up in Mixpanel, navigate back to GTM and publish changes.
Form Submission Event
Tracking form submission in Mixpanel is not a difficult process. It’s similar to how we track form submissions in Google Analytics. The only thing to replace is the tag type custom HTML and pass properties using JS code.
Let’s take an example of how tracking a subscription form that is placed on all pages of your website. Follow the steps to track a form submission:
- Create a new tag
- Rename the tag to something like “Mixpanel Event Subscription Form All Pages”
- Select the tag type as custom HTML
- Copy and paste the below code in the HTML field
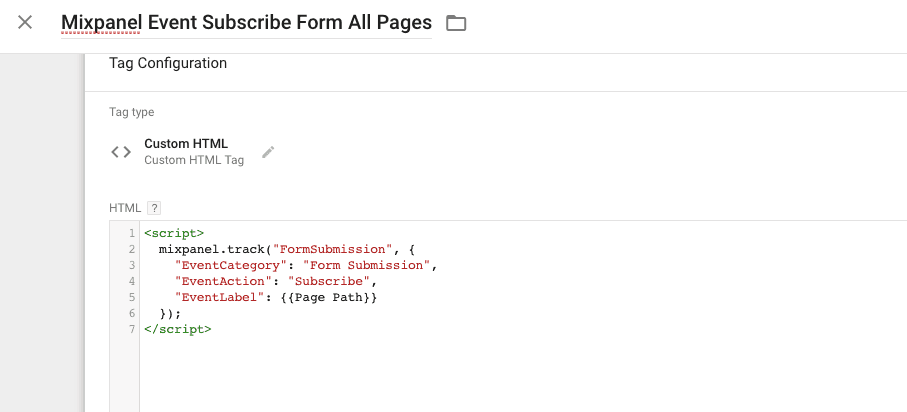
Note: To help you understand I passed the same properties that we use to send data to Google Analytics i.e EventCategory, EventAction, EventLabel
5. Create a new trigger
6. Customize the trigger to submit track event on valid form submission
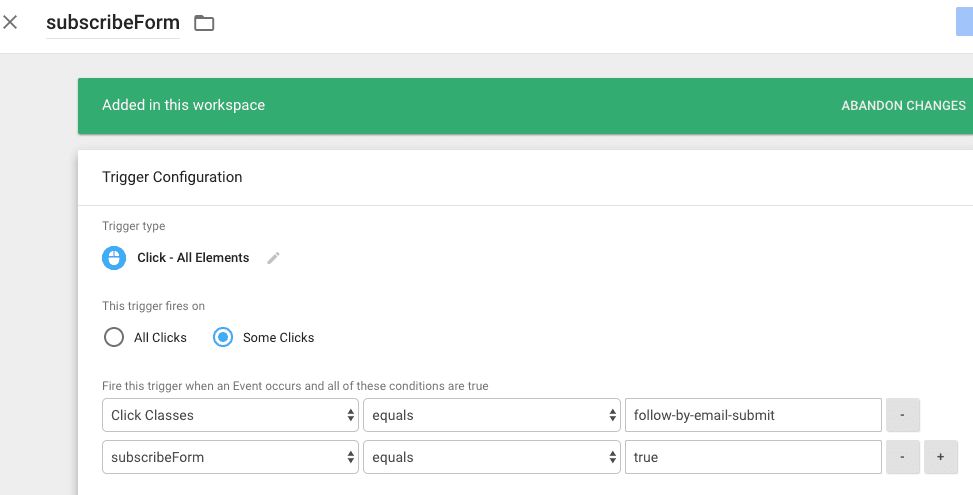
Note: if you are wondering about how I customized this trigger, please follow the article tracking form submissions in Google Tag Manager.
7. Once you add the trigger, save the tag and preview to test the new tag.
8. Open Mixpanel Live View to verify form submission is working.
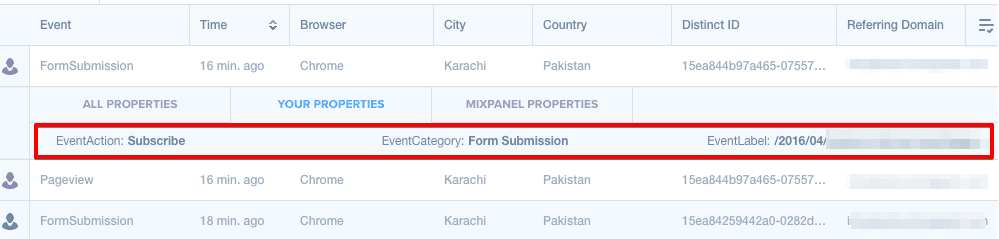
As you can see in the above image, the properties we passed via custom HTML tag are displayed under your properties section.
Bonus: View Top Performing Pages
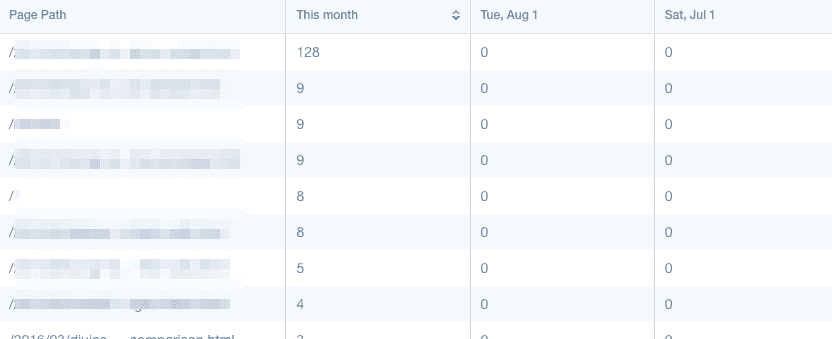
We have now tracked three types of events, pageview, link click, and form submission. Let’s take a look at how we can use pageview event to view the top performing pages.
Follow the steps below to view top performing pages.
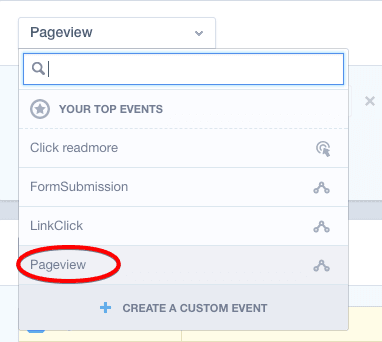
1. Click segments from the left menu
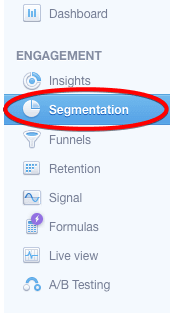
2. Select pageview from the events drop-down
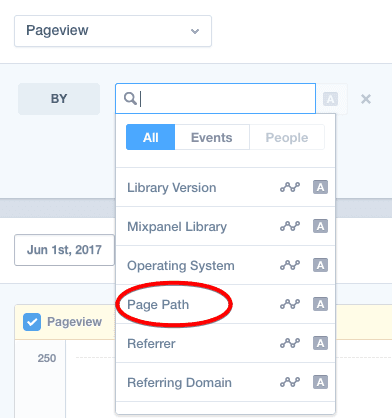
3. From the properties drop-down, select page path
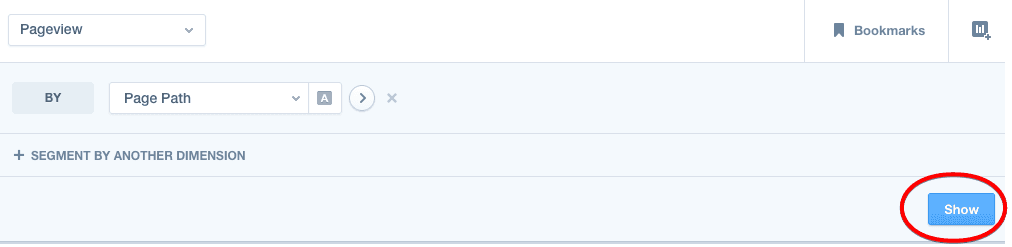
4. Click on show button to display the chart and table
Conclusion
Are you able to get data in your Mixpanel account? If you have any confusion, please ask me in the comments section below. If you are looking for a professional to take care of your Mixpanel account, please get in touch with us.