To maintain an accurate analytics report about user behaviour, it is essential to identify each user separately, so that their behaviour on different events, devices, and sessions can be effectively recorded and the data collected has enough integrity that it can be used for future analysis.
That might make you wonder, how a unique user is identified across multiple devices? How to keep track of the number of devices a user uses to complete a conversion? This is something very useful but hidden in every google analytics account.
The google analytics feature, cross-device tracking helps identify the user behavior across several devices and the way any specific activity is being done. The report that shows cross device tracking is known as ‘cross device reports’.
Initially, these reports are invisible in analytics unless you enable cross device tracking. To get this done, you need to make use of a very important feature called “user-id”, which helps you allocate unique ids to each individual user. To set up cross device tracking via user id in google analytics, follow the steps below and try implement on your analytics account. Here at Marketlytics, we’ve already done this before. You can check our work by clicking here.
#1 What is a User-ID?
A user id in google analytics is a unique set of alphanumeric characters that is assigned to a user to uniquely identify him/her across multiple devices.
Without implementing user-id verification, every interaction of a single user from different devices is recorded as activities by unique users.
Let’s say, one fine day, a visitor reads your blog post on his phone. He decides to subscribe to your website a week later and purchases a product within a month. All these interactions are counted as activities by three different users. Considering this scenario, after implementing user-id, the same visitor performing the same actions is recorded as a single unique user.
 with & without user-id
A unique user-id represents a unique user in google Analytics. Google analytics tracking code generates a client id for each unique device or browser, which is why you need to create and assign your own unique user-id to send data to GA.
All activities associated with the same user id – be it page navigations, clicks or event occurrences, are sent to Google Analytics in correspondence with the same visitor.
#2 User-ID Benefits
- User-id makes it possible to implement cross device tracking because it associates sessions across multiple devices to a single user instead of multiple unique users.
- By setting up user id you can gain access to cross device reports in google analytics.
- With user id you can understand the relationship between multiple devices and engagement between sessions, which is essential while developing new marketing campaigns.
#3 Setting up User-ID in google analytics
The first step is to enable this feature and add your tracking code. By default, cross-device tracking reports are not visible in google analytics accounts. These reports can be accessed by tracking the user with unique sessions across multiple devices.
Create a User-ID
In order to track users across multiple devices, you would need to assign your own user-ids to the user. Follow the steps below to create a user id in google analytics.
Step #1: Log in to your analytics account, navigate to the admin section and from under the property column click on .js tracking info >> User-ID.
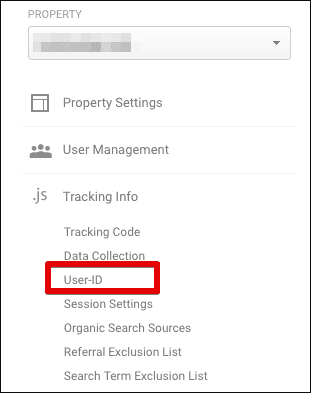 find user id
Step #2: Inside the user-id, read the policy and switch the toggle on, to accept the agreement and click next step.
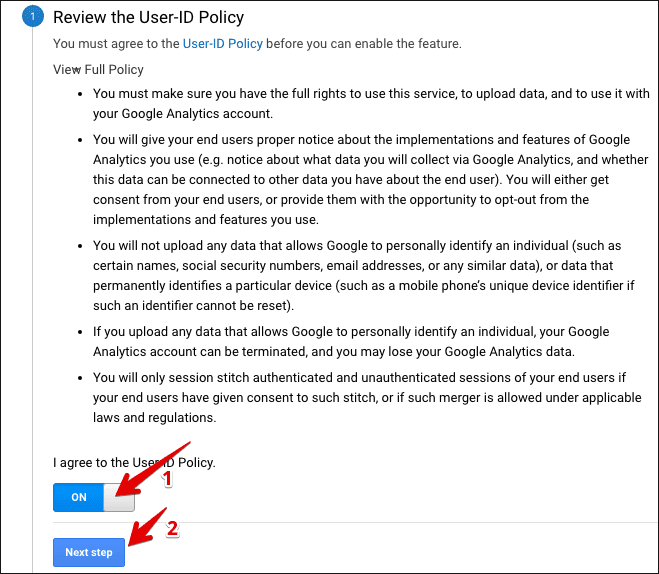 user id policy
Step #3: Setting up user-id does require a change in analytics tracking code. Insert the line of code that is shown in step two into your analytics tracking code.
ga(‘set’, ‘userId’, {{USER_ID}});
Here is how analytics tracking code looks after inserting the user id line of code.
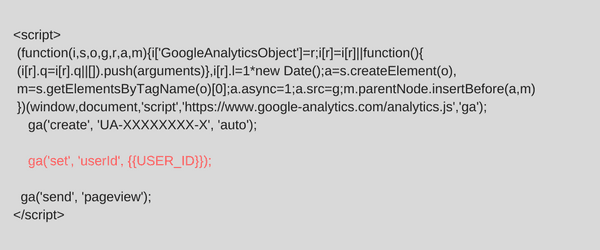 change analytics tracking code
To accomplish this process, you would need a developer help, if you don’t belong to any programming background.
You would need to write code that would pull the login ids from the authentication system and send to GA as the user id.
For further information and help regarding user-id setup click here.
For setting up user id using google tag manager click here.

Step #4: Turn on/off session unification
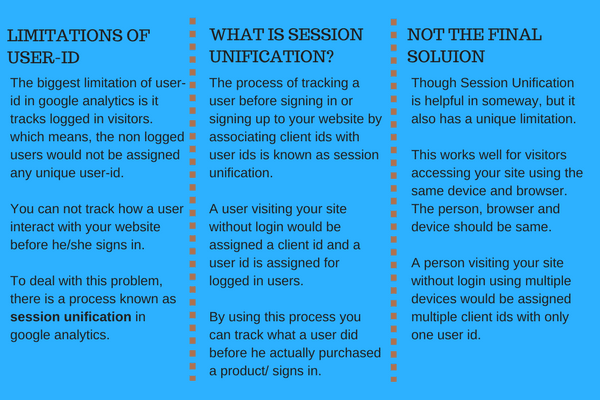 about session unification
Click on the toggle button to turn the feature on.
Step #5: Create a user-id view
So far, your current analytics view does not display cross-device reports. To view and analyze data from sessions in which a user-id is detected, you will need to create a new view.
This will be a filtered view showing cross-device reports to see user engagement on multiple devices with multiple sessions. You can consider it as a breakdown of the activities users participate in during each of their sessions.
To create the new view, from the previous step click on the create button.
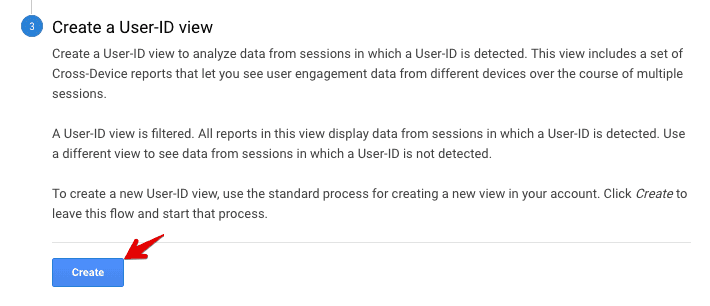 create a new view
Follow the steps ahead to create a view in your analytics account.
#4 Accessing cross device reports in google analytics
To access the cross device reports in your analytics account, open the view created in the previous step. From the left menu navigate to Audience >> Cross Device.
 cross device reports
#5 Understanding the cross device reports
Cross device reports contain three types of reports, which are explained below.
I. Device Overlap
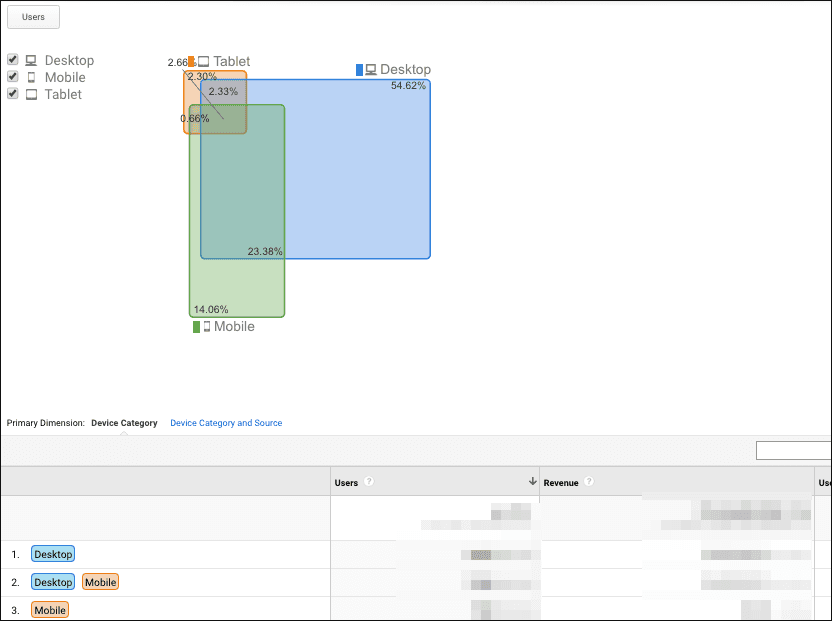 device overlap reports
This report shows you the type of devices a user used while engaging with your website. There are several things you can achieve using device overlap reports.
- This report uses venn diagram to visualize reports, so you can get an idea and compare the percentage of users using a single device with those using multiple devices.
- This report displays data for three types of devices, you can use the checkboxes to include/exclude devices.
- For more deeper analysis you can apply advanced segments to this report. Each segment appears as a separate venn diagram thus making data visualization much better.
- You can segment users by device type and compare revenue and transaction rate.
II. Device path
The device path reports show the order in which a user navigates through your website. You can determine the way a user engages with content of your website and progresses towards a conversion.
Let’s try and understand how to use this report features.
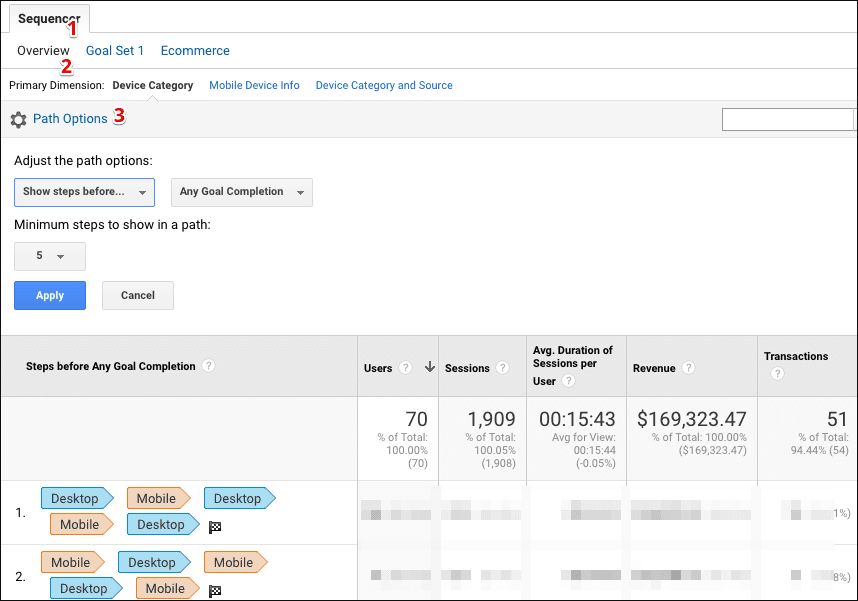 device path reports
- Under the sequencer tab, you can change the way you want to view the reports. For instance, you can choose to view ecommerce reports or just an overview.
- Change the primary dimension. As you can see in the above image, there are three primary dimensions to choose from.
- Device category: Display reports by device category(desktop, mobile, tablet).
- Mobile device info: Displays reports by the name of the mobile brand being used i.e Apple, Samsung etc.
- Device category and source: Displays reports by device category and source i.e desktop/web, mobile/web, tablet/not set.
- Click on the “Path Option” button to view the path before, after or midway any action completed. For example, you want to check which 5 devices a user used before completing any goal. Click on the adjust path options dropdown and select ‘show steps before…’. Once you select, you will see another drop down menu appearing next to it. From that menu, click on ‘Any goal completion’.
Next, choose the minimum steps to show in a path. Click the dropdown and select any number, in our case select 5 and click the Apply button.
 steps before conversion
You can see in the image above, the order in which the devices are being used before the goal completion.
To understand more about device path reports, change the values from the drop down buttons and look at reports.
III. Acquisition Device
With acquisition device reports you can determine whether a user converted from the originating device or from some other device.
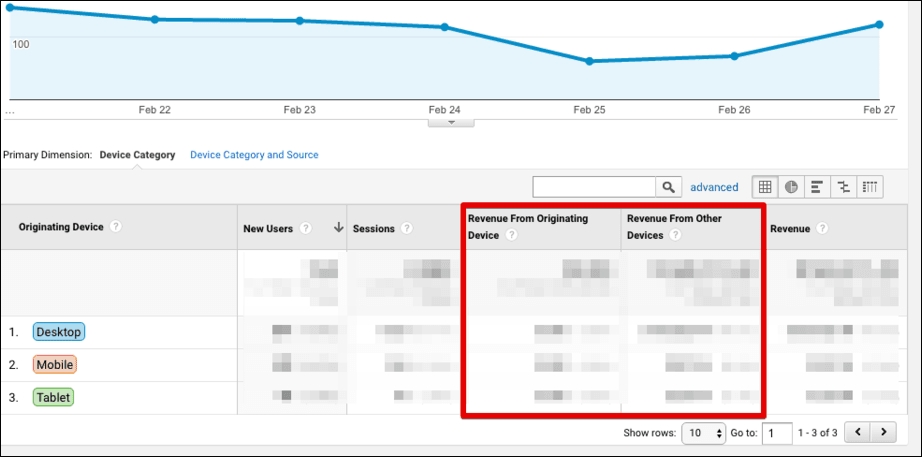 acquisition device reports
After assigning the user id, the very first time a user uses a device to interact with your content is known as originating device.
The two columns, Revenue from originating device and revenue from other devices are important to understand.
Revenue from originating device shows the revenue generated from a particular device that a user used the first time to visit your site. For instance: a user visited your site for the first time using his/her tablet and purchased a product using the same device.
Revenue from other devices displays revenue generated from devices other than the originating device. For instance: a user first visited your site with a desktop and then purchased a product using a tablet.
#6 User Engagement Reports
User engagement reports (Audience >> behavior >> user engagement) displays some important reports related to logged in users.
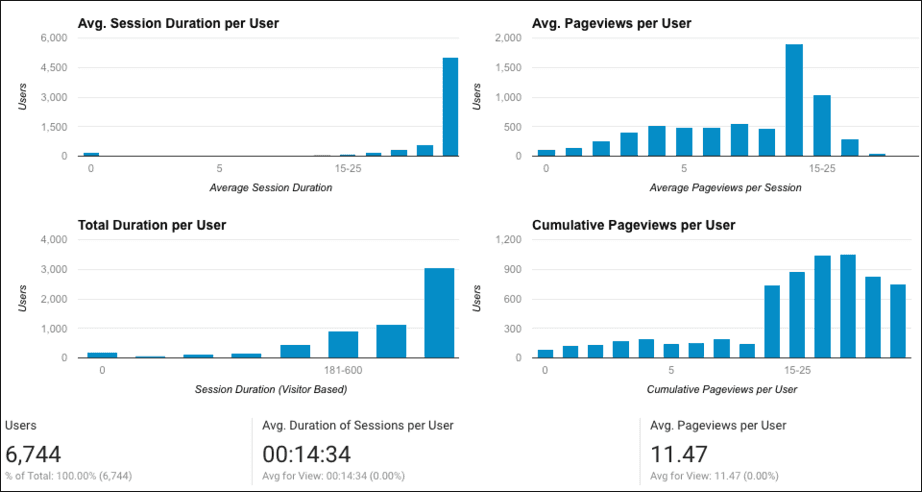 user engagement reports
Now it’s your turn to implement cross device tracking and go through cross device reports to understand how your potential customers behave. Don’t forget to buzz our comments if you have any questions.


