Whenever we talk about event tracking in Google Tag Manager, we mean to trigger a tag in response to the user interaction. The interaction might be a form submission, video play, button click or a pdf download.
“Events are user interactions with content that can be tracked independently from a web page or a screen load.”
But why exactly we need to look after what each user is upto? Tracking user activity can majorly help analysts to determine how and what triggers a specific action or using a more relevant term, conversions.
So, if you are looking for an easy way tracking method, you should consider using Google Tag Manager for Event Tracking.
With Google Tag Manager, you can catch each user action, and do so in the simplest manner. GTM eliminated the need of hard-coding every activity or event you want to track. Just assign a tag to static-ish attributes like IDs and URLs so that they are less prone to changes and each time a user interacts with that attribute, a corresponding tag is fired. For entities with no such components that can hold a tag, there is always the Data Layer Event Code approach.
This article will help you use Google Tag Manager for event tracking and by the end, you will be able to track outbound links, form submissions and pdf downloads in google tag manager.
- Event Tracking in Google Analytics vs Tag Manager
- Understanding The GTM Components
- Google Tag Manager Event Examples
Index
Google Analytics Event Tracking vs Tag Manager Events
Whether you are using Google Tag Manager or Google Analytics for event tracking, the end result would always be the same. The only difference is of the method both tools use for tracking events.
Setting up event tracking in google analytics always requires a change in javascript code snippet and if you are not too familiar with coding, you’d have to rely on a developer.
On the other hand, event tracking in google tag manager frees you from modifying code every time you want to track something. Once, you setup GTM you would only be playing around with tags and triggers.
GTM is all about managing tags from a single place and triggering them on specific actions. At the first glance, google tag manager might seem a little complicated but actually, it is ranked as the easiest tag managing system by data analysts so far.
If you have ever tried event tracking in google analytics, you would know that the code snippet {ga(“send”, “event”,”category”, “action”,”label”)} sends information about the event to google analytics.
“Google Tag Manager only fires tags in response to events.”
While using Google Tag Manager, a few mouse clicks will get the job done in a few minutes. If you aren’t aware of the powers GTM has got, I suggest you go through what google tag manager can do for you.
One important thing you need to understand here is, Google Tag Manager events are different than you see in Google Analytics. Events in GTM tells when a user actions happens, based on this we can trigger any tags(google analytics, adwords or custom html) or do nothing at all.
Google Tag Manager Components
Many of you might not be familiar enough with google tag manager interface. So, before getting started with the real examples of event tracking, you should familiarize yourself with few key components of GTM.
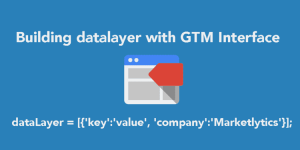
“Google Tag Manager uses “triggers”, “variables” and a “data layer” to set up the firing of tags on your website or mobile app.”
Tags
A tag is a code snippet which executes on a set of pages and is controlled by a single interface instead of adding codes directly to webpage. The purpose of tags is to send information to third party applications and tools. For example, a google analytics pageview tag sends your site activity to Google. Similarly an event tag will send event attribute data to google analytics.
Triggers
A trigger is a condition that should respond with either a true or a false during runtime. In GTM, you can not create a tag without creating the corresponding trigger first. You can either create the trigger while configuring a tag or from the triggers menu. But it is recommended to create the trigger before setting up the tag.
Variables
A variable in GTM is a name-value pair for which the value is generated during run time. For instance, the variable Page URL will always contain the current page URL and the Page Hostname will always contain the hostname for current page.
You can read more about tags, triggers and variables here.
Google Analytics Events Tracking in Tag Manager
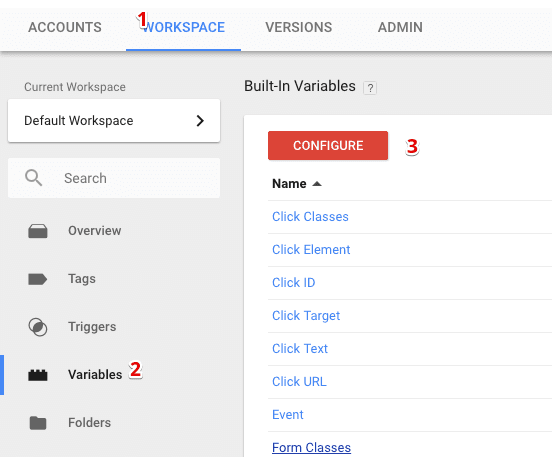
To help you understand more about creating google analytics events in google tag manager, let’s take a look at some real examples. But before doing anything further, make sure you have all built-in variables(Pages, Clicks, Forms ) enabled in GTM. You can do this by navigating to workspace >> variables >> built-in variables and clicking on the configure button.
1. Tracking Outbound Links in Google Tag Manager
For tracking any outbound link on your site, follow the steps below:
Step1: login to GTM and select the specific account
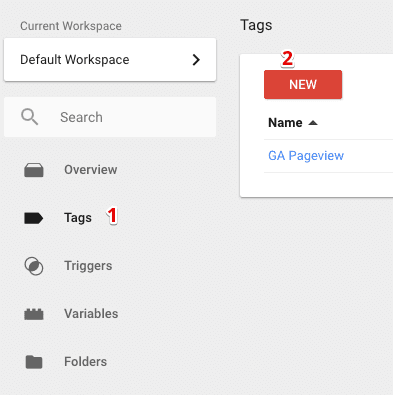
Step2: Create a new tag in google tag manager
Step3: Enter the tag name as “Outbound Links”, click on tag configuration and select universal analytics as the tag type.
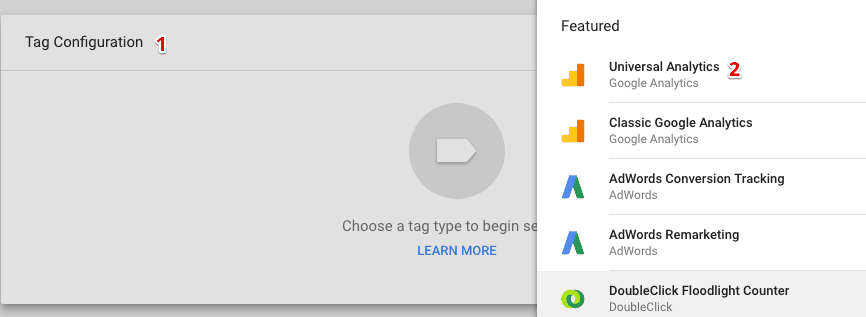
Step4: Fill the tag configuration data.
-
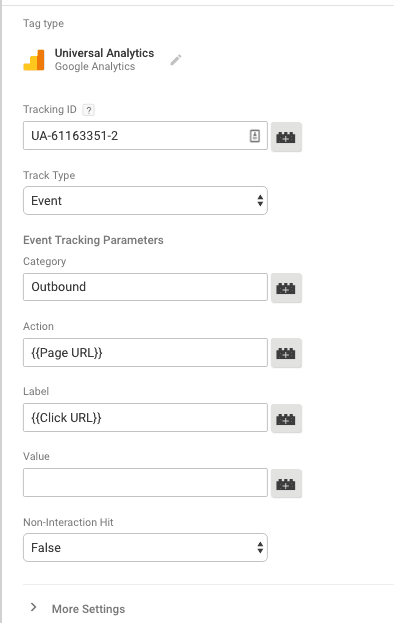
Enter the tracking ID. This is the google analytics tracking id. You can get it by logging into google analytics and navigating to admin >> property >> tracking info >> tracking id. Alternatively, you can get this from your GA pageview tag.
-
Select the track type as Event
-
Enter Outbound in the category field
-
Choose action as Page URL. This is a built-in variable which gets the page url containing the outbound link.
-
Choose label as Click URL. this is again a built-in variable which gets the destination url )
Your final tag configuration should look similar to
Step5: Click on create trigger or choose the existing trigger. In this case, we didn’t created any trigger before, so we will create a new trigger. Follow the below steps to create trigger for outbound links.
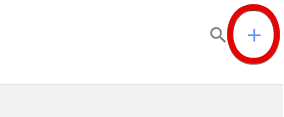
1. From the pop up window, click on the plus(+) icon on the top right of the window.
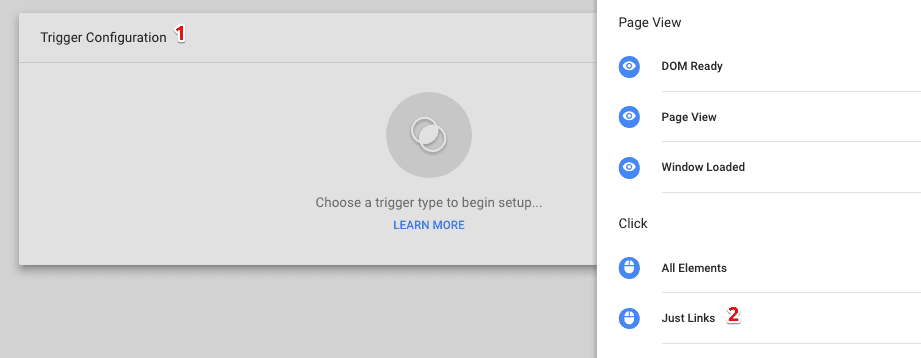
2. Enter the trigger name as Outbound Link Click, click on the tag configuration and select the trigger type as Just Links.
3. Select both checkboxes i.e wait for tags and check validation.
4. Enable the trigger when matches regex ‘.*’. This means the trigger is enabled on all pages of your site. Learn more about regex here.

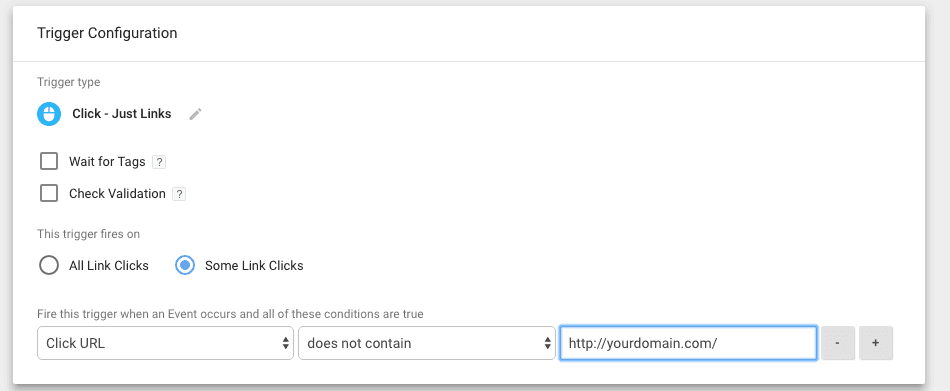
5. Control the trigger to only fire on links that points to a different website. You will have to set the filter to fire when ‘Click URL does not contain www.yourdomain.com’. This is a very simple method to apply filter. You can also do this by entering regex or creating a new variable and passing your domain name as the value.
Your final trigger should look similar to
Save the trigger and then the tag.
Step6: Finally, preview and debug the new tag. From the publish drop down menu, click on preview button. Open your website in a new tab and click on an outbound link. If the outbound link fires, go back to tag manager, leave the preview mode and publish the tag.

You are done!
2. Tracking successful form submission
Tracking form submissions in google tag manager is quite easier than google analytics. Follow the steps below to implement form submission tracking in Google Tag Manager.
Step1: copy the URL of the page where you have embedded the form.
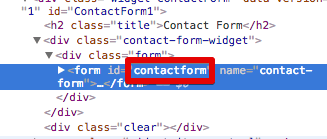
Step2: Copy the form id. Right click on the page containing the form and select ‘Inspect’ and check for id attribute in the form tag.
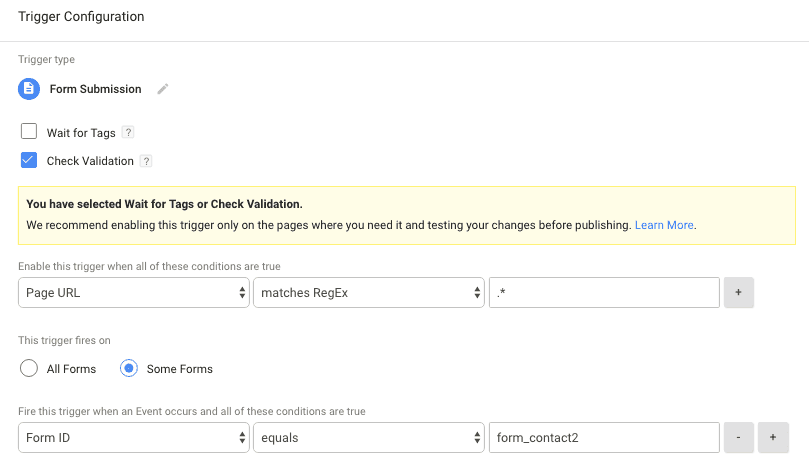
Step3: Create a new trigger in google tag manager to check form submission.
-
Enter the trigger name as Check form submit
-
Choose the trigger type as Form Submission
-
Check the check validation checkbox to verify form submission after validating the form.
-
Enable this trigger on pages containing the form. If your form is embedded on multiple pages then use a regex(.*) and if it’s on a single page, enter the page url.
-
Enter the form id
Your final trigger should look similar to
Step4: Create a new tag in GTM to send the form submit event to GA. Follow the steps below to create this tag:
-
Create a new tag and name it Send Form Submit Event to GA
-
Select the tag type as Universal Analytics
-
Enter the property id
-
Select the track type as Event
- Enter the event tracking parameters
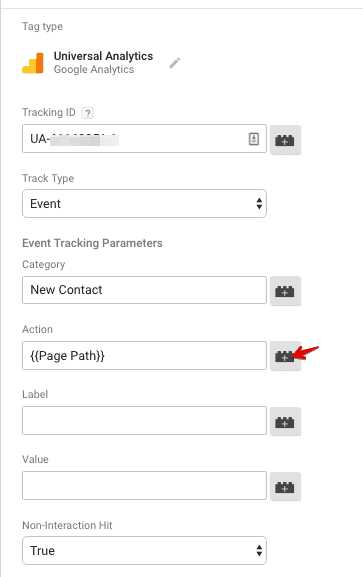
Note: Choosing event action as page path will display the page on which the form submit event was triggered. This is useful in cases when you have same form on multiple pages. Set the non-interaction hit to true, so that event tracking will not affect your website’s bounce rate.
6. Click on the Triggering button to choose the trigger. In this case, select the
Check Form Submit trigger we created earlier.
7. Save the tag.
Now the final step is to preview and debug the container to see if the new tag is firing.
If everything is ok, publish the container.
Note: If you are looking for tracking only valid forms or if you have a form without thank you page and it reloads when you press the submit button, you should follow the awesome guide: improving Form Submission Tracking in Google Tag Manager.
3. Tracking PDF Downloads in Google Tag Manager
There are multiple ways of tracking pdf downloads in google tag manager but I will show you the simplest method. You might have experienced that when you download a Pdf file, it opens in the browser.
I am using the click listener method so when someone clicks on a pdf link an event will be generated. Follow the steps below to track pdf downloads in google tag manager.
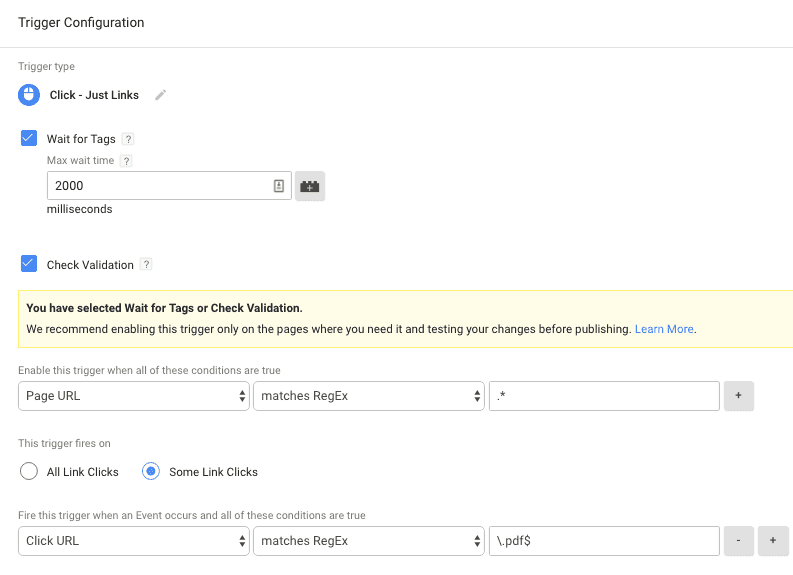
Step1: Create a trigger that will fire when someone clicks on a pdf link
-
Inside the GTM workspace, click on triggers and create a new trigger.
-
Name the trigger as PDF Link Clicks
-
Choose the trigger type as just links
-
Check the wait for tags and check validation check boxes
-
If you have multiple pdfs located on your site, enable the trigger on all pages. Enable the trigger when page url matches regex (.*)
-
Choose the trigger to fire on some link clicks. When click url matches regex. The regex for pdf file would be \.pdf$
-
Save this trigger.
Your final trigger will look like
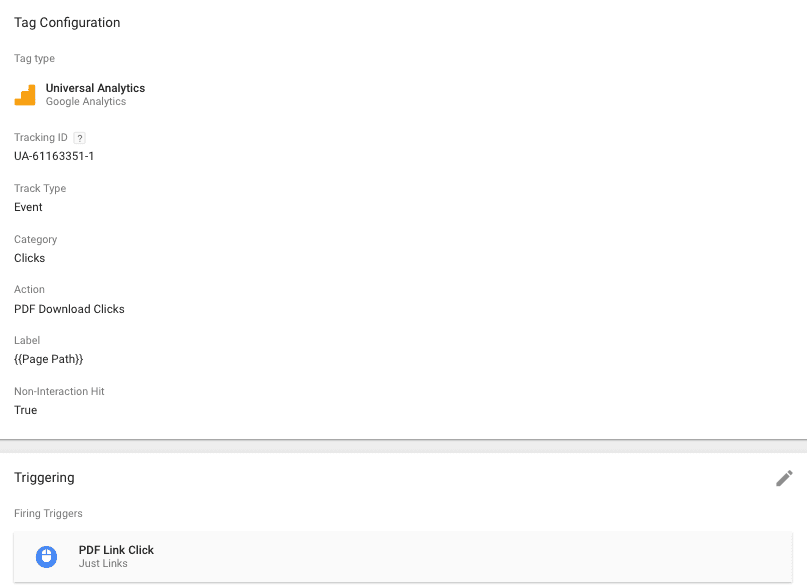
Step2: Create the google analytics tag
-
Within your workspace create a new tag
-
Name it GA PDF Download
-
From tag configuration, choose the tag type as universal analytics
-
Enter the tracking id of the property where you want to send the event data
-
Choose track type as event
-
Enter name for event category and action
-
Choose the label as page path or page url
-
Set the non-interaction hit as true so this will not effect your website bounce rate.
-
Choose the trigger PDF Link Click we created earlier to fire on this tag.
-
Save the tag
Your final pdf download tag will look like
Test and debug this tag before publishing new changes to the workspace.
If you have successfully implemented any events you should be able to see the events data in google analytics. To see this data in google analytics, navigate to Behavior >> Events >> Overview.
4. Scroll Tracking Google Tag Manager
Click here to follow the easy way.
When a user lands on your page, chances are he/she leave without any interaction or scrolls down to the bottom of the page. GTM now enables you to check if a user scrolls your page and if so, how long the page did they do it for.
Below is a step by step guide for implementing scroll tracking in google analytics using google tag manager. In the above examples, we tracked users action with built-in tags but here you will be able to get your hands dirty with custom tags.
Before going any further, please make sure to have the following requirements:
-
You have google analytics installed on your site
-
Your have deployed google analytics via GTM
-
You have a basic knowledge of GA and GTM
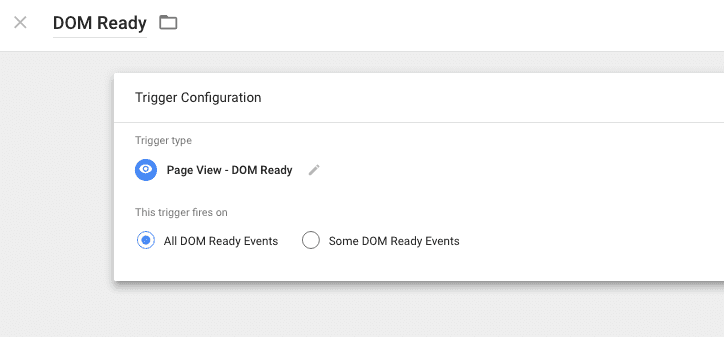
Step1: Login to your tag manager and find your website container. Inside the workspace, create a trigger to ensure the scroll depth tags fires when the DOM is ready.
Step2: within the workspace, from the left menu, click on triggers, create a new trigger and choose the type as DOM Ready and name it “DOM ready”. Save this trigger.
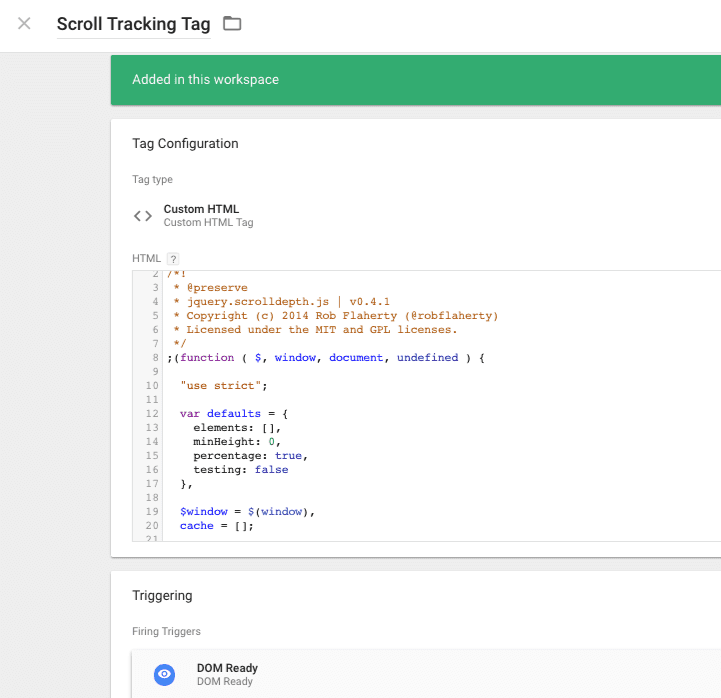
Step3: Once you create the trigger, click on tags from the left menu and create a new tag. This time choose the tag type as Custom HTML.
Step4: click on the below url. Copy the code and paste into the html field.
This code creates a datalayer push whenever a scroll tracking event is fired.
Step5: click on the triggering area and select the DOM ready trigger we created earlier.
Your final scrolldepth tag should look similar to
Step6: save this tag.
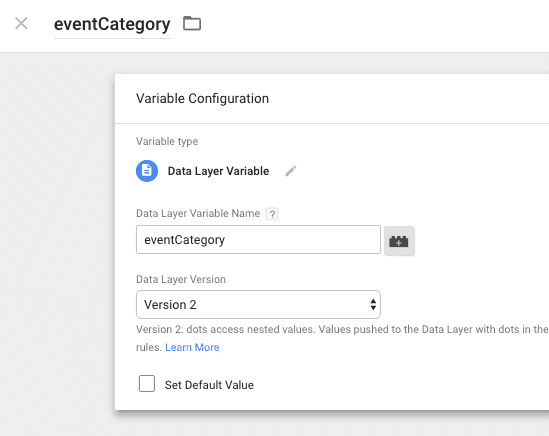
Step7: Move to the variables tab to create variables that will send event data to google analytics. From the left menu, click variables and create a new variables. Name the variable as eventCategory, choose the type as data layer and enter the name as eventCategory. The result should look like:
Step8: save the configuration and repeat with the other three entries, but replace the data layer variable and variable name with eventAction, eventLabel and eventValue.
Step9: We have now created variables that will send the information that JS scroll tracking pushes to data layer. Create a new google analytics event tag and enter the event tracking parameters as variables we just created above.
Your final tag should look similar to:

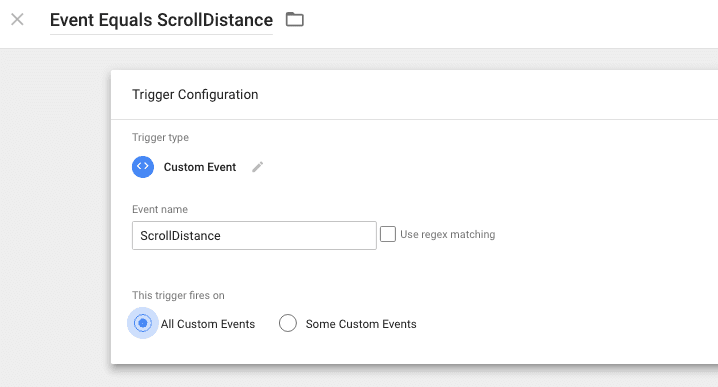
Step10: Click on the triggering area below the tag configuration and click on the + icon to create a new trigger. Name the trigger as Event Equals Scroll Distance, select the trigger type as Custom Event and enter the event name as Scroll Distance. Your final trigger should look somewhat like
Step11: Finally, preview and debug the workspace and check if the tags are firing properly. The fired tags should look like this
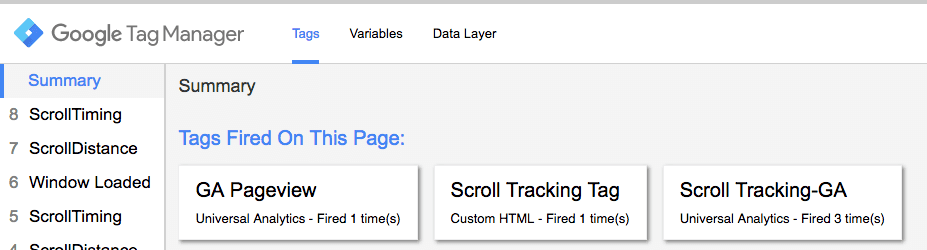
Once you see the results as above, leave the preview mode mode publish the new changes in the workspace.
Until now, you should have successfully implemented the above GTM events and be able to see the data in google analytics. If you have any confusions please feel free to ask in the comments below or directly contact us for implementing other custom events with google tag manager.